


This post belongs to the Page specific JavaScript in Phoenix framework series.
Thanks to our personal experience working on legacy Rails applications, we've been
able to see several different approaches on how other developers usually organize
JavaScript assets.
Choosing the wrong approach, or not even having one, will give you some headaches
in the future – in other words, just requiring everything in your manifest file (application.js) and relying on multiple document load handlers across serveral files with the hope that everything will just work fine is not a good idea.
For our last projects (both client and internal ones) we've been replacing the Asset Pipeline
with Webpack to handle asset files requirement and build process, loving the result so far.
That's why the first time I took a look at Phoenix's documentation and discovered
that there was not such a thing as the Asset Pipeline I got instantly hooked by it.
Simple approach using Brunch and ES6
In order to build assets, Phoenix initially comes with Brunch out of the box, and
not only that, it also comes configured to support ES6 by default, including
its modules syntax. Taking advantage of this, let's generate a very basic project and
see how we can create a better way of organizing the JavaScript instead of putting
everything we might need in app.js as if it was a Rails project.
Generating the project
Let's begin by installing the lates version on Phoenix:
$ mix archive.install https://github.com/phoenixframework/archives/raw/master/phoenix_new.ez && mix local.phoenix

Found existing archive(s): phoenix_new.ez.
Are you sure you want to replace them? [Yn]
* creating /Users/myuser/.mix/archives/phoenix_new.ez
Found existing archive(s): phoenix_new.ez.
Are you sure you want to replace them? [Yn]
* creating /Users/myuser/.mix/archives/phoenix_new.ez
Now that we are up to date, let's generate a new Phoenix project:
$ mix phoenix.new phoenix_template

* creating phoenix_template/config/config.exs
* creating phoenix_template/config/dev.exs
* creating phoenix_template/config/prod.exs
* creating phoenix_template/config/prod.secret.exs
* ...
* ...

We are all set! Run your Phoenix application:

    $ cd phoenix_template
    $ mix phoenix.server

You can also run your app inside IEx (Interactive Elixir) as:

    $ iex -S mix phoenix.server

Before moving on, configure your database in config/dev.exs and run:

    $ mix ecto.create
After following the instructions and running the server we can see that the new application is ready.
Shared common JavaScript between views
Before continuing let's first think about what our good old web application is going to need. There's probably going to be some common js functionality shared across the whole application, like handling pulldown menus in the header, initialazing third party plugins, etc. Having this in mind we can create our first js module that will be in charge of all this common functionality that needs to be executed on every page:
// web/static/js/views/main.js

export default class MainView {
  mount() {
    // This will be executed when the document loads...
    console.log('MainView mounted');
  }

  unmount() {
    // This will be executed when the document unloads...
    console.log('MainView unmounted');
  }
}
The MainView module will basically have to main functions:
- mount which will be called every time the page loads and will contain all the initializing of common functionality needed.
- umount which can be used to add any functionality needed to be executed when the document unloads. This might be useful in some situations like showing a confirm alert to the user when he tries to leave an edit view with unsaved changes, for example.
Now let's update the main app.js file so it uses the new MainView module:
// web/static/js/app.js

import 'phoenix_html';
import MainView from './views/main';

function handleDOMContentLoaded() {
  const view = new MainView();
  view.mount();

  window.currentView = view;
}

function handleDocumentUnload() {
  window.currentView.unmount();
}

window.addEventListener('DOMContentLoaded', handleDOMContentLoaded, false);
window.addEventListener('unload', handleDocumentUnload, false);
We add an event listener so when the DOM is completely loaded it initialzes the
MainView, mounts it and assigns it globally. We are also doing the same for the
unload event of the document. If we now open the web inspector, we can see the log
message and verify everything that is working fine:
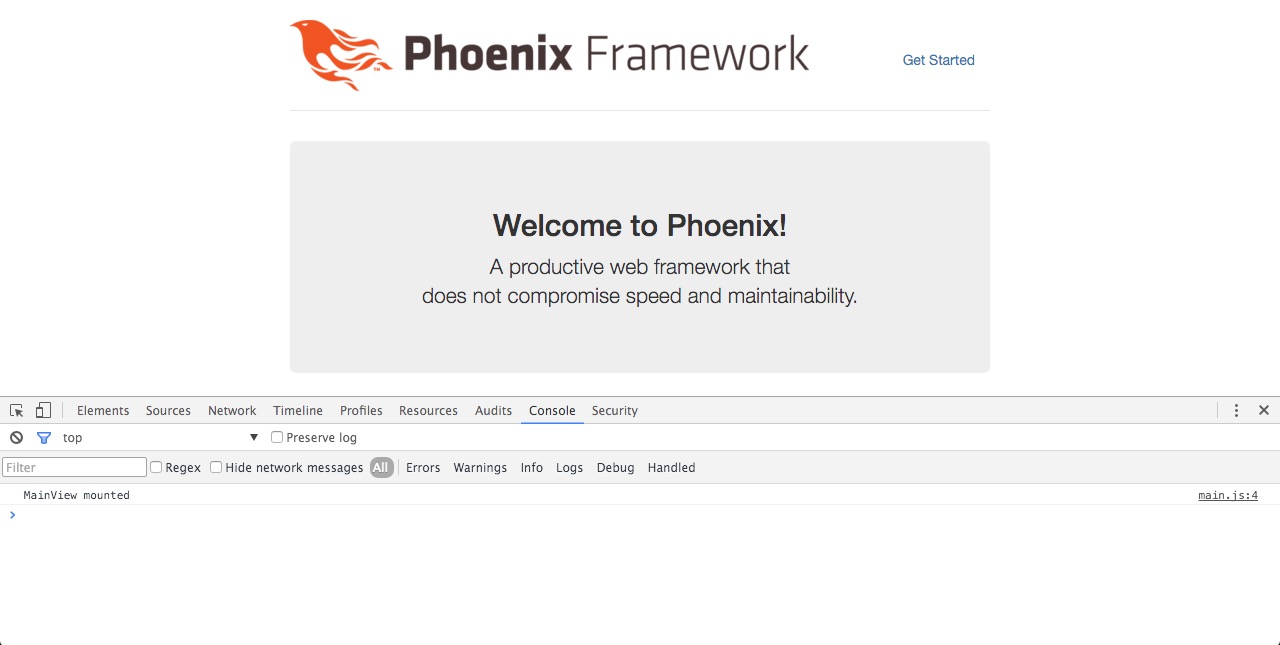
We can see the log message, yay! Let's add one more route so we can navigate through both the root and the new one and check what happens:
# web/router.ex

defmodule PhoenixTemplate.Router do
  use PhoenixTemplate.Web, :router

  # ...
  # ...

  scope "/", PhoenixTemplate do
    pipe_through :browser # Use the default browser stack

    get "/", PageController, :index
    get "/new", PageController, :new
  end
end
We need to add the new action to the existing controller:
# web/controllers/page_controller.ex
defmodule PhoenixTemplate.PageController do
use PhoenixTemplate.Web, :controller
# ...
def new(conn, _params) do
render conn, "new.html"
end
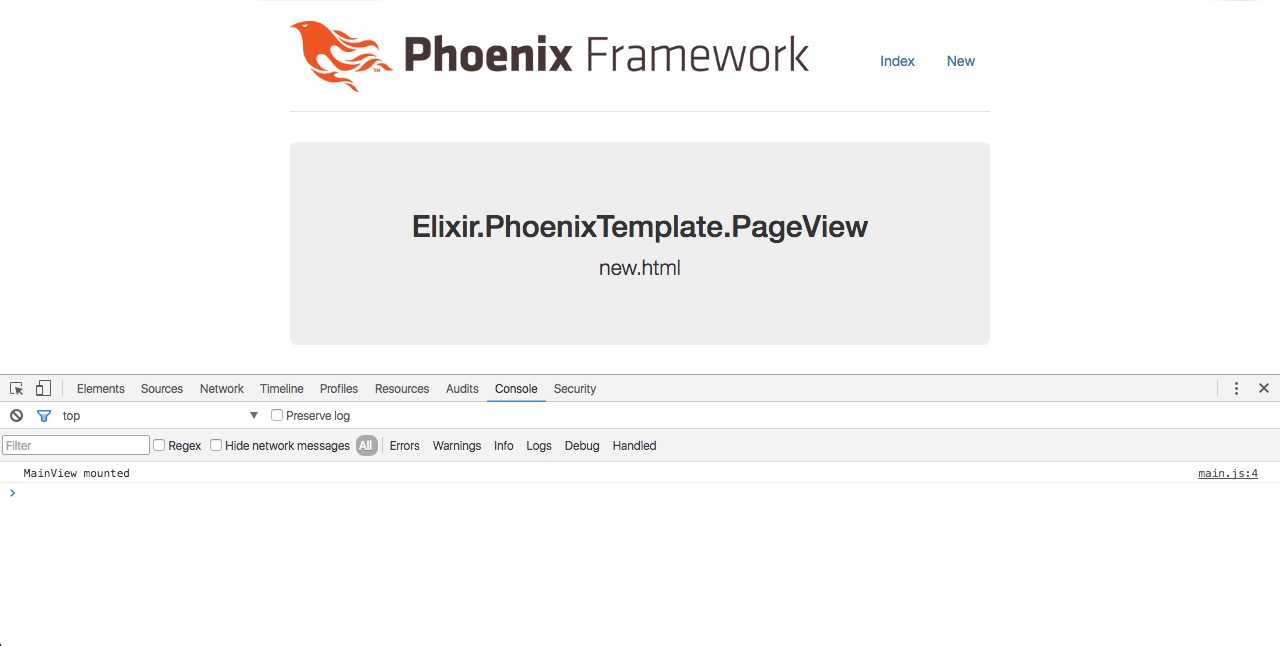
endNext step is to create the new template and update the existing index one, so
they display the current view module and template:
<!-- web/templates/page/index.html.eex -->
<!-- web/templates/page/new.html.eex -->

<div class="jumbotron">
  <h2><%= @view_module  %></h2>
  <p class="lead"><%= @view_template %></p></p>
</div>
Finally we have to update the main layout template with the navigation links:
<!-- web/templates/layout/app.html.eex -->

...
...

<body>
    <div class="container">
      <header class="header">
        <nav role="navigation">
          <ul class="nav nav-pills pull-right">
            <li><%= link("Index", to: page_path(@conn, :index)) %></li>
            <li><%= link("New", to: page_path(@conn, :new)) %></li>
          </ul>
...
...
Now we can click in the new link and check that it works just the same as before:
From now on, every time we create a new route and it's view/template is shown to the user, all the common JavaScript functionality will be executed exactly the same as in any other route. But what happens I if we want to add some unique behaviour to a specific view/template?
View/tempate specific JavaScript
The main idea is to specify somehow in the app.js the JavaScript view we want to mount
instead of the MainView, but executing all the common stuff as well. To do so we are
going to create a helper function to generate the current view/template name which we'll
use later to mount it. Let's add it to the LayoutView module:
# web/views/layout_view.ex

defmodule PhoenixTemplate.LayoutView do
  use PhoenixTemplate.Web, :view

  @doc """
  Generates name for the JavaScript view we want to use
  in this combination of view/template.
  """
  def js_view_name(conn, view_template) do
    [view_name(conn), template_name(view_template)]
    |> Enum.reverse
    |> List.insert_at(0, "view")
    |> Enum.map(&String.capitalize/1)
    |> Enum.reverse
    |> Enum.join("")
  end

  # Takes the resource name of the view module and removes the
  # the ending *_view* string.
  defp view_name(conn) do
    conn
    |> view_module
    |> Phoenix.Naming.resource_name
    |> String.replace("_view", "")
  end

  # Removes the extion from the template and reutrns
  # just the name.
  defp template_name(template) when is_binary(template) do
    template
    |> String.split(".")
    |> Enum.at(0)
  end
end
The result for the Elixir.PhoenixTemplate.PageView view and index.html template
will be PageIndexView, and on the other hand, for the new.html template will
be PageNewView. Now we need a place to set the returning name so that it's accessible
to the JavaScript, so let's add it as a data attribute to the body tag:
<!-- web/templates/layout/app.html.eex -->

...
...

<body data-js-view-name="<%= js_view_name(@conn, @view_template) %>">

...
After refreshing the browser and inspecting the source code it should look something like this:
<body data-js-view-name="PageIndexView">All right! So let's create a specific JavaScript view for the new.html template:
// web/static/js/views/page/new.js

import MainView from '../main';

export default class View extends MainView {
  mount() {
    super.mount();

    // Specific logic here
    console.log('PageNewView mounted');
  }

  unmount() {
    super.unmount();

    // Specific logic here
    console.log('PageNewView unmounted');
  }
}
Note how View extends MainView and how we are calling its super functions in both
mount() and mount(). This way it will run all the common functionality like in any
other view/template before running any specifc logic. Now we need a mechanism to
load the current view name module so we can call its mount and unmount methods, so
let's write a simple loader module:
// web/static/js/views/loader.js

import MainView    from './main';
import PageNewView from './page/new';

// Collection of specific view modules
const views = {
  PageNewView,
};

export default function loadView(viewName) {
  return views[viewName] || MainView;
}
We need to import any specific page view we need to have and add it to the views object.
The loadView function will try to return it by its viewName argument, returning the
MainView if not found. Finally we need to change the code in the app.js file in order
to use the loadView function:
// web/static/js/app.js

import 'phoenix_html';
import loadView from './views/loader';

function handleDOMContentLoaded() {
  // Get the current view name
  const viewName = document.getElementsByTagName('body')[0].dataset.jsViewName;

  // Load view class and mount it
  const ViewClass = loadView(viewName);
  const view = new ViewClass();
  view.mount();

  window.currentView = view;
}

function handleDocumentUnload() {
  window.currentView.unmount();
}

window.addEventListener('DOMContentLoaded', handleDOMContentLoaded, false);
window.addEventListener('unload', handleDocumentUnload, false);
Note the subtle change in the handleDOMContentLoaded. It gets the viewName from
the body's data attribute previously set by the js_view_name/2 function. Then it
uses the loadView function to get the view class by viewName and creates a new
view object with it and calling its mount method. And with this, we are done!
If we inspect the browser's console it should look somehting like this:

We can now see the 2 log messages resulting from calling the mount function of
the view object which is a PageNewView. One message for the super.mount() call and
the second one of its own.
Conclusion
Thanks to this small changes we can organize the JavaScript of a fresh new generated Phoenix project in a more tiddy and efficient way, without the need of any other third party libraries, appart from those which are initially added. Of course there can be several different ways of achieving something similar, like removing Brunch and using Webpack and it's dynamic module loading, which we will comment on the next post. Meanwhile, don't forget to check out the source code:
Happy coding!