This post belongs to the Phoenix & Elm landing page series.
- Bootstrapping the project and the basic API functionality to save our first leads
- Building the landing page UI and the basic Elm subscription form
- Adding Google reCAPTCHA support to avoid spambots
In the previous part of the series, we created the landing page main layout and implemented the Elm subscription form, which lets visitors subscribe, saving their name and email in the leads database table. We do not want spambots to subscribe, therefore, in this part we are going to add a protective layer to the subscription process using Google’s reCAPTCHA, which consists of two different steps:
- Adding the reCAPTCHA widget to the Elm subscription form, and sending the user’s response along with the name and email.
- Verifying in the server-side the user’s response against Google’s RECAPTCHA API to verify whether is valid or not
Without further ado, let’s do this!
Adding the reCAPTCHA widget to the form
First of all, we need to head to Google’s reCAPTCHA admin site and register our website, using localhost as the domain, to get the necessary keys that we need.
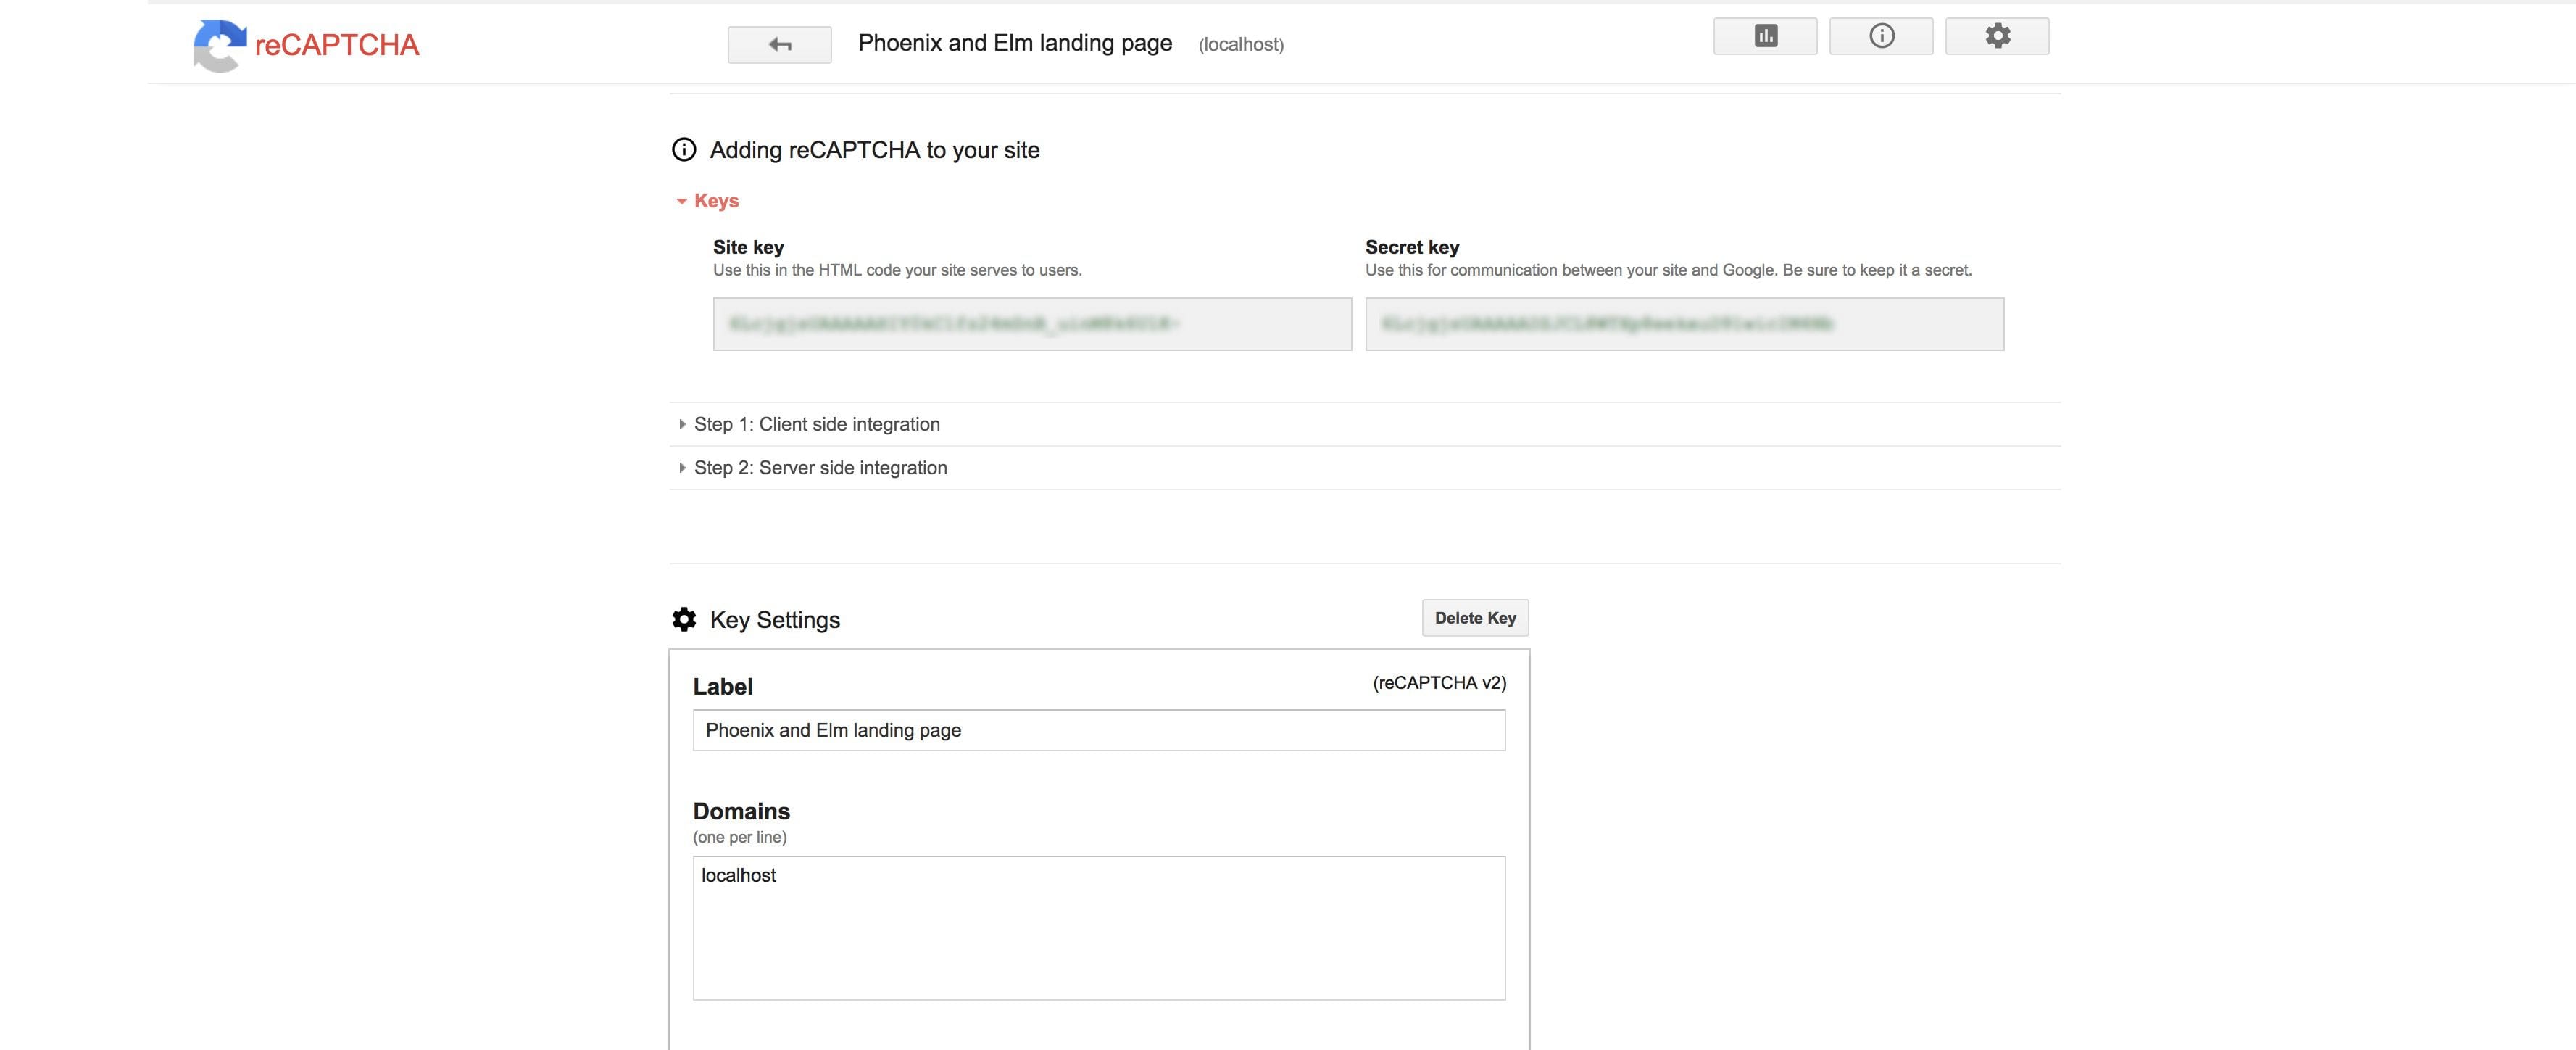
Next, we have to add Google’s reCAPTCHA script in the main template, so let’s edit it:
# lib/landing_page_web/templates/layout/app.html.eex

<!DOCTYPE html>
<html lang="en">
<!--... -->


  <body class="landing-page">
<!--... -->


    <script src="https://www.google.com/recaptcha/api.js?onload=onloadCallback&render=explicit" async defer></script>
  </body>
</html>
We are not only adding the script but passing the onload and render
parameters to render the widget explicitly and to call the
onloadCallback function once the script gets loaded. The plan is to
render the widget inside the Elm form, and for that we need the script to
be loaded before rendering it, so let’s edit the main app.js file to
achieve this:
// assets/js/app.js

import Elm from './elm/main';

window.onloadCallback = () => {
  const formContainer = document.querySelector('#form_container');

  if (formContainer) {
    const app = Elm.Main.embed(formContainer);
  }
};
Now that the Elm program is embedded once the script is ready, we have to
render the widget somehow using its internal API. Before continuing any
further, let’s update the View module and add a new div where we want to
render the widget:
# assets/elm/src/View.elm

module View exposing (view)

-- ...

formView : SubscribeForm -> Html Msg
formView subscribeForm =
        -- ...

        , Html.div
                [ Html.class "field" ]
                [ Html.div
                        [ Html.id "recaptcha" ]
                        []
                , validationErrorView "recaptcha_token" validationErrors
                ]

        -- ...
How can we tell the external reCAPTCHA script that we want it to
render the widget inside the div with recaptcha id? In Elm, the proper way
of communicating with external JavaScript is by using ports, so let’s go
ahead and create a new module with a port to initialize the widget:
-- assets/elm/src/Ports.elm

port module Ports exposing (..)

-- OUT PORTS


port initRecaptcha : String -> Cmd msg
The initRecaptcha port function receives a string which is the id of the
container where we want to render the widget and returns a command.
Therefore, we can use it in the main init function, and the port will get
called once the program starts for the first time:
-- assets/elm/src/Main.elm

module Main exposing (main)

import Ports
-- ...

init : ( Model, Cmd Msg )
init =
    initialModel ! [ Ports.initRecaptcha "recaptcha" ]

-- ...
Now we can go back to the app.js script and subscribe to the
initRecaptcha port:
// assets/javascript/app.js

import Elm from './elm/main';

window.onloadCallback = () => {
  const formContainer = document.querySelector('#form_container');

  if (formContainer) {
    const app = Elm.Main.embed(formContainer);
    let recaptcha;

    app.ports.initRecaptcha.subscribe(id => {
      window.requestAnimationFrame(() => {
        recaptcha = grecaptcha.render(id, {
          sitekey: 'YOUR_SITE_KEY',
        });
      });
    });
  }
};
app.ports contains all the ports from the Elm program. By subscribing to
any of them, we are making the passed function to get called anytime
a port gets triggered by the Elm runtime. In our case, it is using
Google’s reCAPTCHA script to render the widget inside the specified id,
using the sitekey we created previously from the admin site. Also, note
that we are wrapping the render function inside
window.requestAnimationFrame, forcing the script to initialize the widget
immediately after the form renders for the first time. Not doing it like
so may create race conditions between Elm programs and external JavaScript
components, so don’t forget using it. Let’s jump to the browser and see
the result:
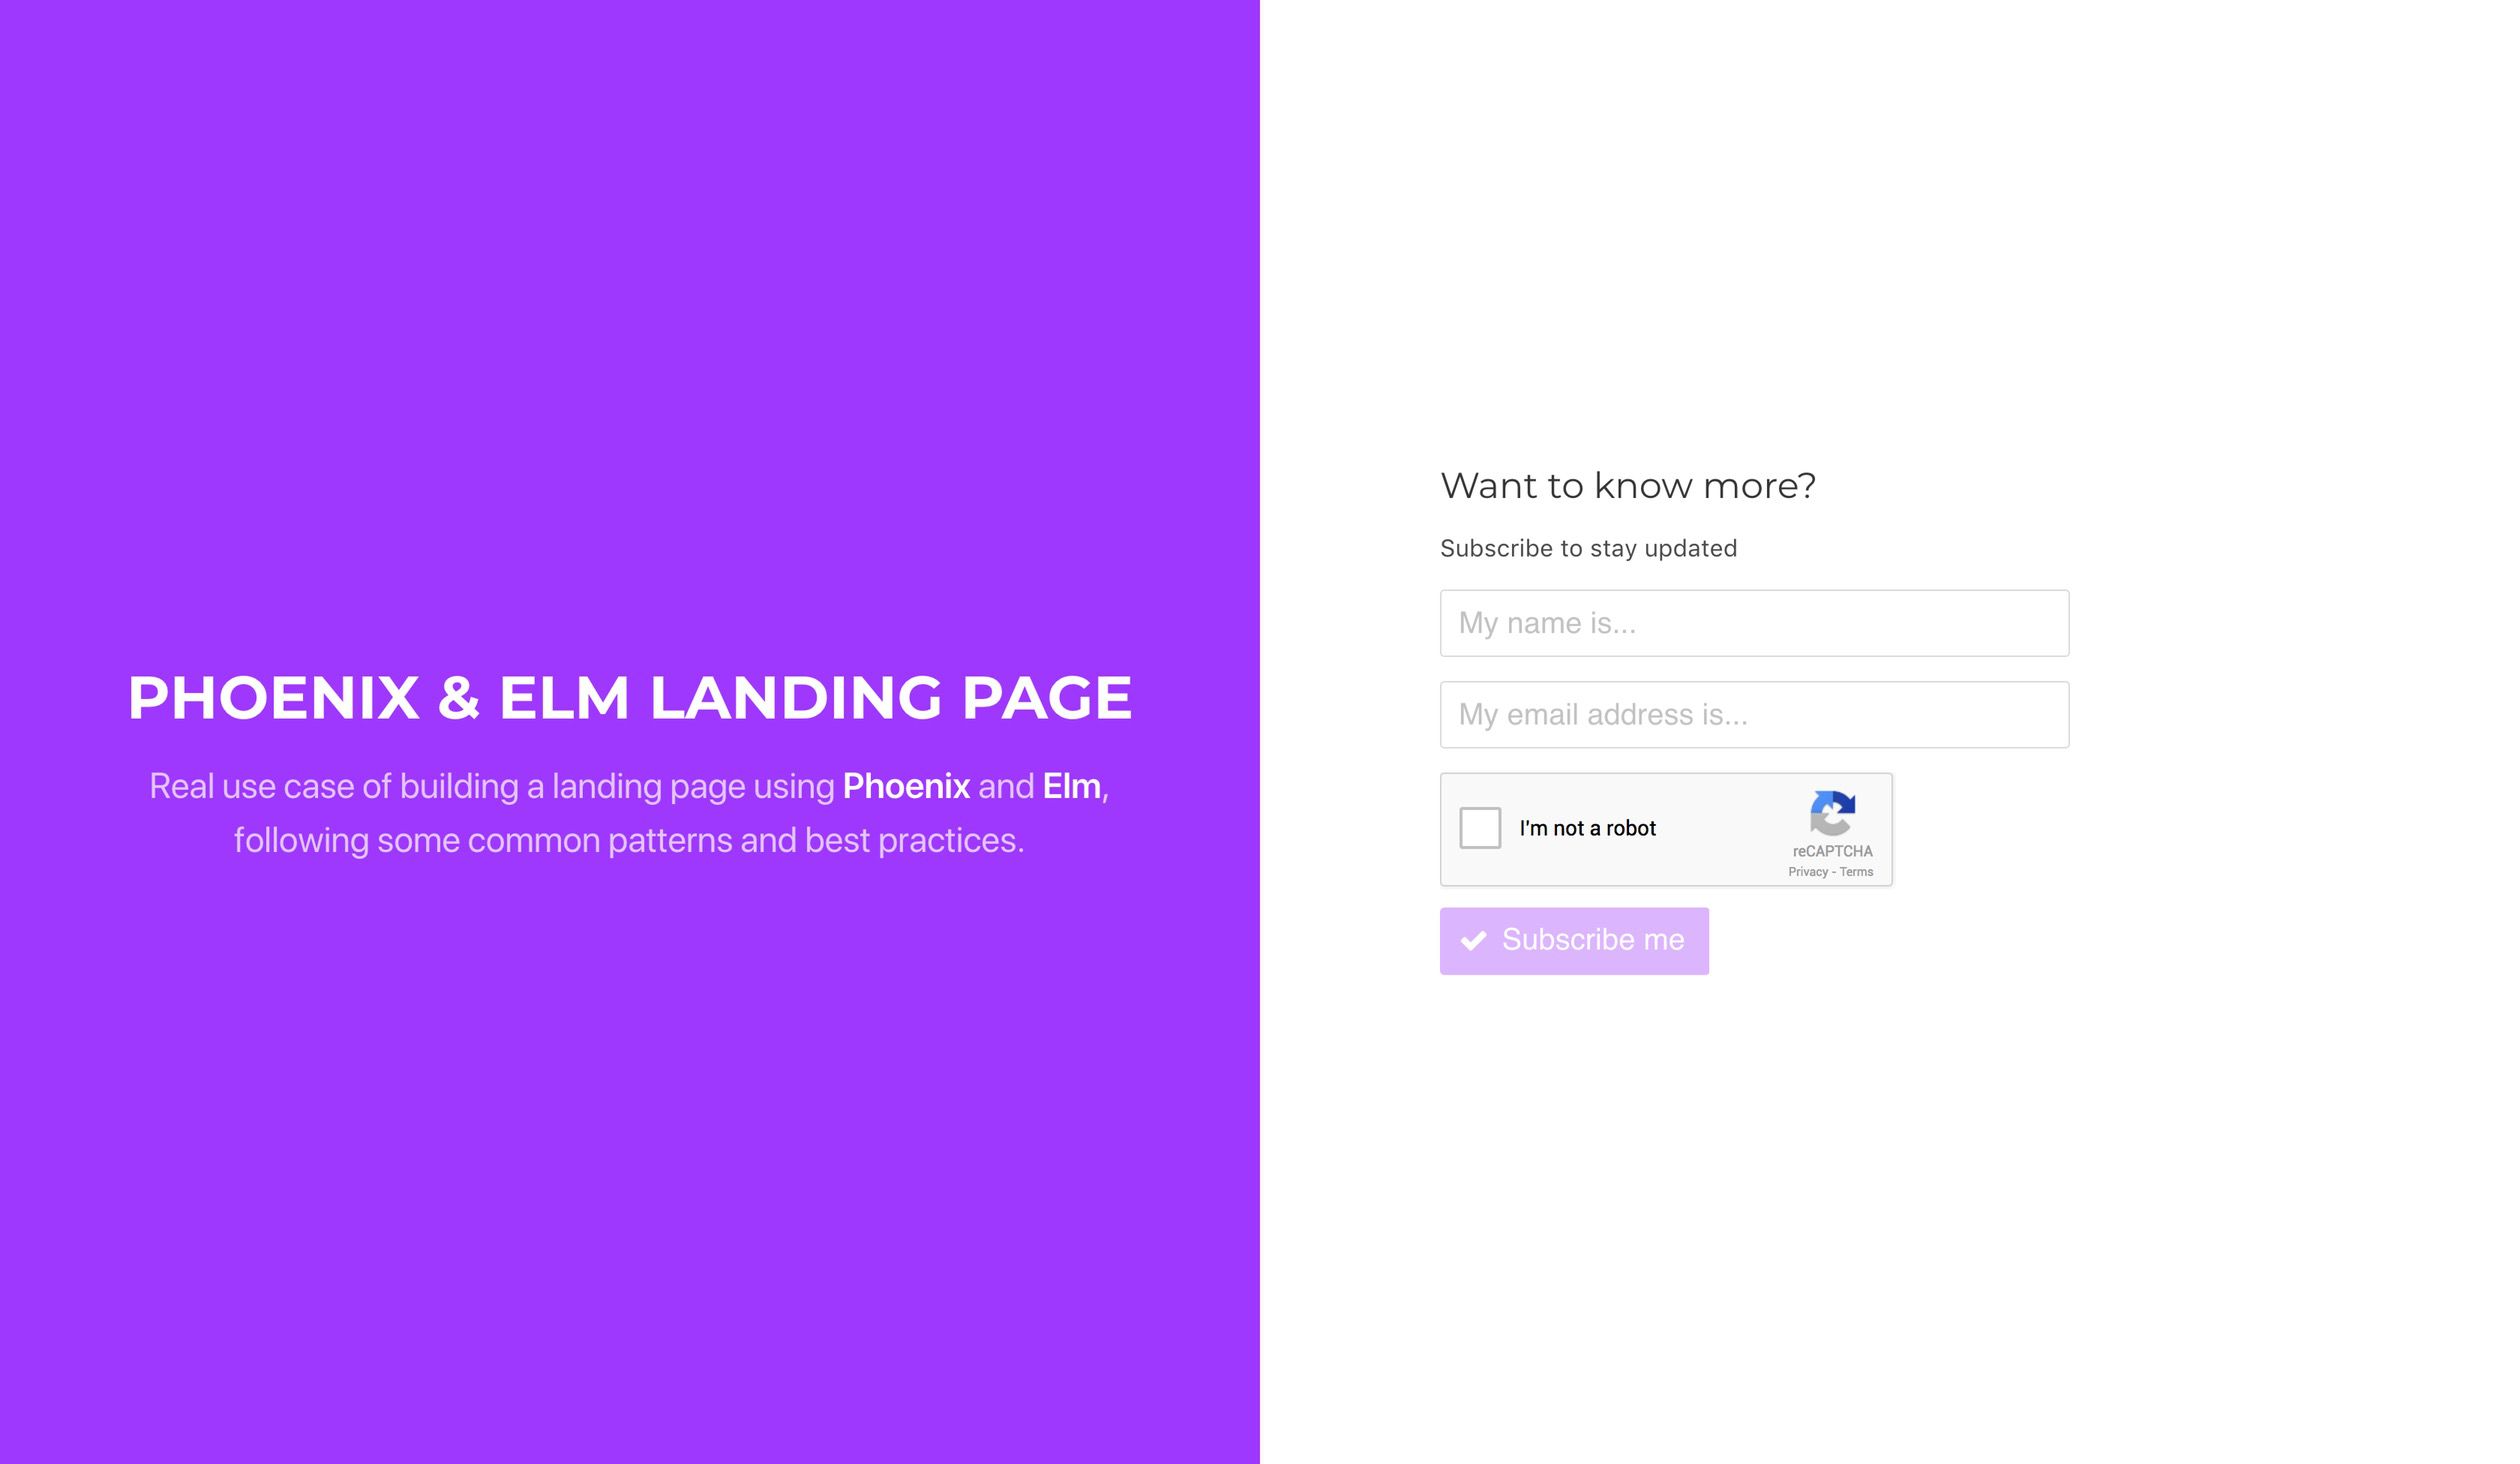
The widget renders as expected, yay!
Setting the reCAPTCHA token
When a visitor clicks on the widget, it generates a token that we need to
validate against Google reCAPTCHA API, so we need to send it to the server
along with the full_name and the email. Before this, let’s edit the model
module to add a new key in the SubscribeForm so we can store the token:
-- assets/elm/src/Model.elm

module Model exposing (..)


type alias FormFields =
    { fullName : String
    , email : String
    , recaptchaToken : Maybe String
    }

-- ...

emptyFormFields : FormFields
emptyFormFields =
    { fullName = ""
    , email = ""
    , recaptchaToken = Nothing
    }

-- ...
How can we store in it the token received from the external reCAPTCHA widget? As sending messages to external JavaScript, Elm can also receive messages from the outer world by subscribing to incoming ports. Knowing this, let’s create a new port which receives the reCAPTCHA token from the widget:
-- assets/elm/src/Ports.elm

port module Ports exposing (..)

-- ...


-- IN PORTS


port setRecaptchaToken : (String -> msg) -> Sub msg
When Elm receives the setRecaptchaToken port, we want it to set the token
in the model, and for that, we need to create a new message type:
-- assets/elm/src/Messages.elm

type Msg
    = HandleFullNameInput String
    -- ...
    | SetRecaptchaToken String
We also need to handle this message in the update function:
-- assets/elm/src/Update.elm

module Update exposing (update)

update : Msg -> Model -> ( Model, Cmd Msg )
update msg model =
    -- ...

    SetRecaptchaToken token ->
        { model | subscribeForm = Editing { formFields | recaptchaToken = Just token } } ! []
As mentioned before, Elm needs to subscribe to incoming ports, so let’s go
ahead and define the subscriptions function to put all the pieces together:
-- assets/elm/src/Main.elm

-- ...

subscriptions : Model -> Sub Msg
subscriptions model =
    Ports.setRecaptchaToken SetRecaptchaToken
The only thing left is sending the token from JavaScript:
// assets/javascript/app.js

import Elm from './elm/main';

window.onloadCallback = () => {
  // ...

    app.ports.initRecaptcha.subscribe(id => {
      window.requestAnimationFrame(() => {
        recaptcha = grecaptcha.render(id, {
          sitekey: 'YOUR_SITE_KEY',
          callback: app.ports.setRecaptchaToken.send, // <- CHECK THIS OUT
        });
      });
    });

  // ...
};
The reCAPTCHA widget has a callback option which is a function that gets
called after checking the visitor’s response and which contains the token,
and which we can use to send the setRecaptchaToken port message to Elm.
Let’s check that everything is working as expected:
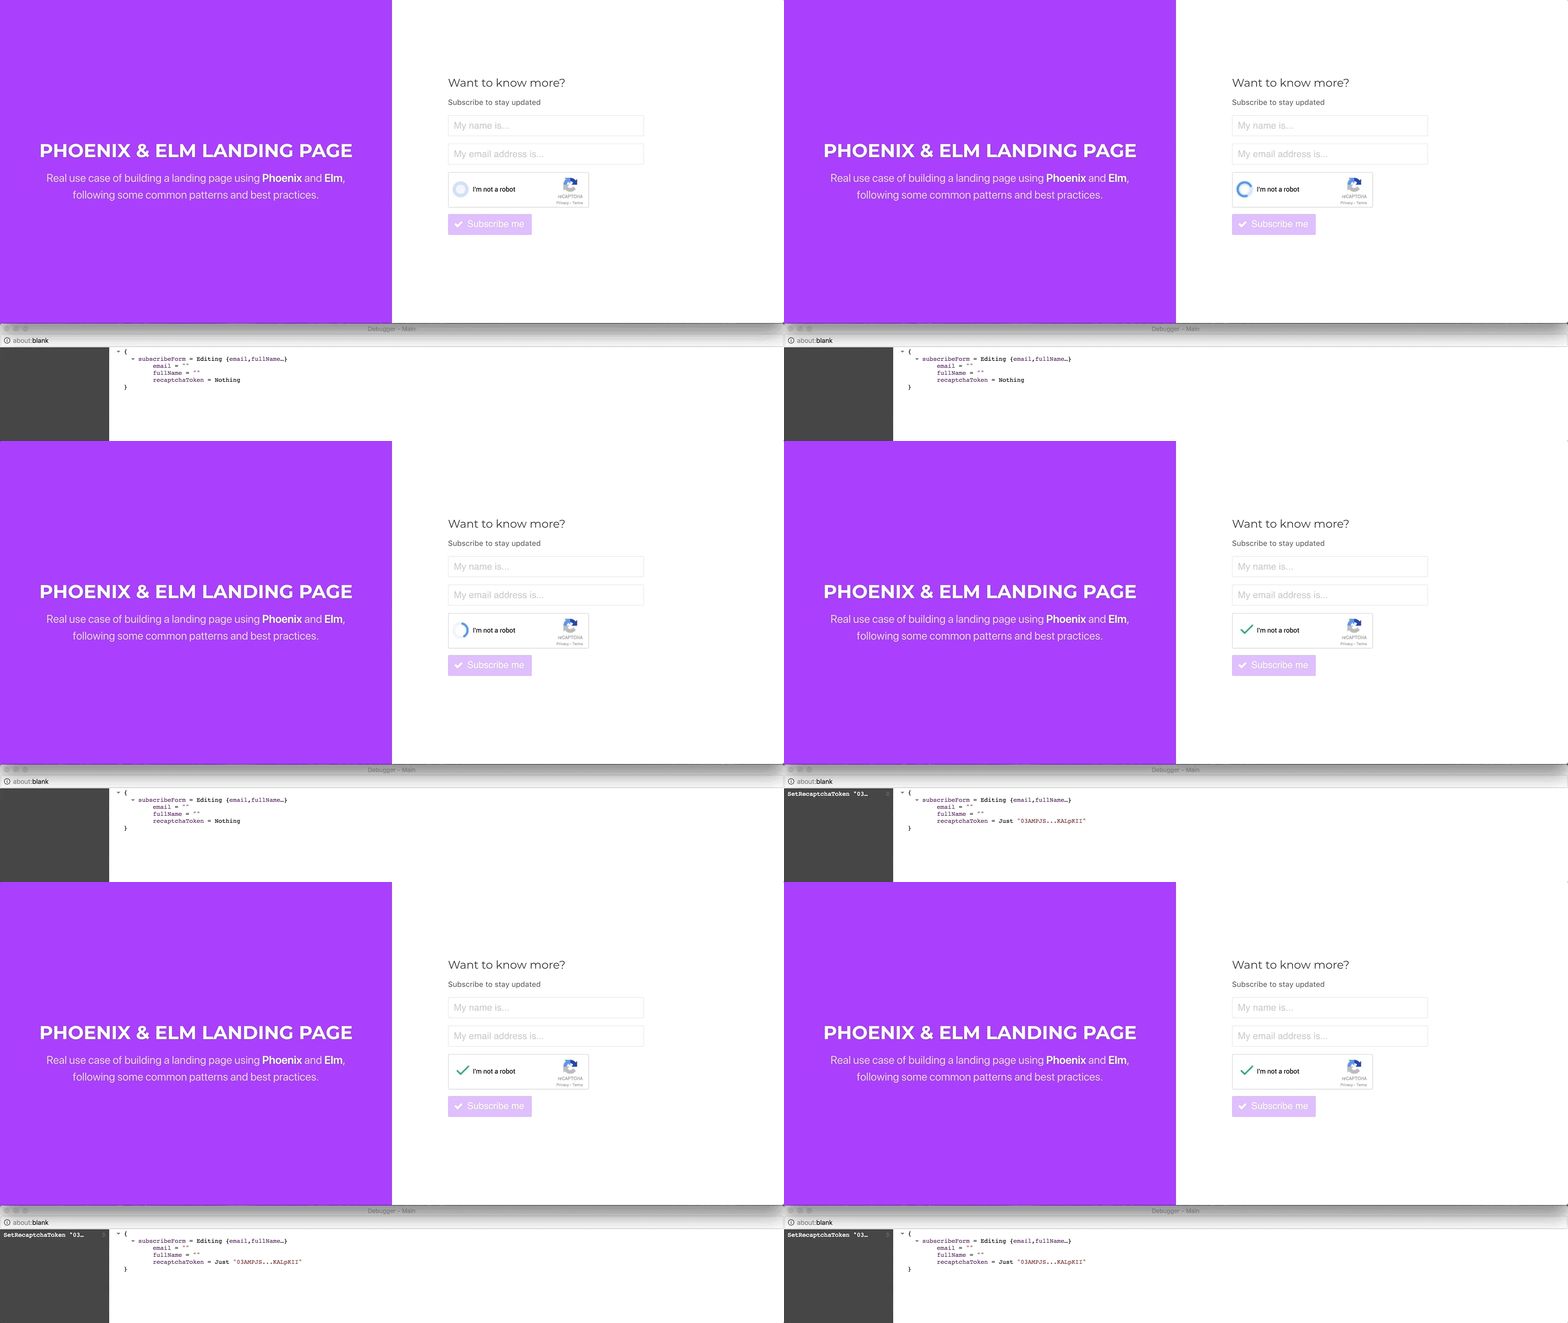
Using Elm’s debugger, we can verify that when we click on the reCAPTCHA
widget, ELm handles the SetRecaptchaToken message, setting the
recaptchaToken received through the setRecaptchaToken port in the model.
The only thing left, for now, is preventing sending the form while the
recaptchaToken is not set, so let’s fix this in the view module:
-- assets/elm/src/View.elm

module View exposing (view)

-- ...

formView : SubscribeForm -> Html Msg
formView subscribeForm =
    let
        { fullName, email, recaptchaToken } =
            extractFormFields subscribeForm


        -- ...

        buttonDisabled =
            fullName
                == ""
                || email
                == ""
                || recaptchaToken
                == Nothing
                || recaptchaToken
                == Just ""
                || saving
                || invalid

        -- ...
    in
        -- ...
Finally, we have to include the recaptchaToken value to the HTTP request body:
-- assets/elm/src/Commands.elm

module Commands exposing (subscribe)

-- ...

encodeModel : FormFields -> JD.Value
encodeModel { fullName, email, recaptchaToken } =
    JE.object
        [ ( "lead"
          , JE.object
                -- ...

                , ( "recaptcha_token", JE.string "foo" )
                ]
          )
        ]
Server-side reCAPTCHA token validation
Now that the form is sending the token, we can implement the second step
of the process, which is validating it against Google’s API. Although we
are somehow forcing the recaptcha_token value to have a non-empty value,
let’s add a validation check on the backend, so no leads with empty tokens
can get saved. As we only need to validate it, and not save it, we can add
a virtual field to the Lead schema:
# lib/landing_page/marketing/lead.ex

defmodule LandingPage.Marketing.Lead do
  use Ecto.Schema
  import Ecto.Changeset
  alias LandingPage.Marketing.Lead

  @derive {Poison.Encoder, only: [:full_name, :email]}

  schema "leads" do
    field(:email, :string)
    field(:full_name, :string)

    field(:recaptcha_token, :string, virtual: true)

    timestamps()
  end

  @fields ~w(full_name email recaptcha_token)a

  @doc false
  def changeset(%Lead{} = lead, attrs) do
    lead
    |> cast(attrs, @fields)
    |> validate_required(@fields)
    |> unique_constraint(:email)
  end
end
This change breaks the tests, so let’s go ahead and fix them:
# test/landing_page/marketing/marketing_test.exs

defmodule LandingPage.MarketingTest do
  use LandingPage.DataCase

  # ...

  @valid_attrs %{
    "email" => "some email",
    "full_name" => "some full_name",
    "recaptcha_token" => "foo"
  }
  @invalid_attrs %{email: nil, full_name: nil, recaptcha_token: nil}

  # ...
end
# test/landing_page_web/controllers/v1/lead_controller_test.exs
defmodule LandingPageWeb.V1.LeadControllerTest do
use LandingPageWeb.ConnCase
# ...
describe "POST /api/v1/leads" do
test "returns error response with invalid params", %{conn: conn} do
conn = post(conn, lead_path(conn, :create), %{"lead" => %{}})
assert json_response(conn, 422) == %{
"full_name" => ["can't be blank"],
"email" => ["can't be blank"],
"recaptcha_token" => ["can't be blank"]
}
end
test "returns success response with valid params", %{conn: conn} do
params = %{
"lead" => %{"full_name" => "John", "email" => "foo@bar.com", "recaptcha_token" => "foo"}
}
conn = post(conn, lead_path(conn, :create), params)
assert json_response(conn, 200) == %{"full_name" => "John", "email" => "foo@bar.com"}
end
end
endIf we now run the test suite, we can see that every test is passing now:
➜ mix test
...........

Finished in 0.1 seconds
11 tests, 0 failures

Randomized with seed 66361
To check whether Google has verified the user, we have to send an HTTP
request to https://www.google.com/recaptcha/api/siteverify with the
token. For that we first need to install an HTTP client like
HTTPoison, so let’ go ahead and add
it to the dependencies list:
# mix.exs

# ...

  defp deps do
    [
      # ...
      {:httpoison, "~> 0.13"}
    ]
  end

# ...
After running the necessary mix deps.get task, we are ready to implement
our Google’s HTTP client, so let’s create the following module:
# lib/landing_page/clients/google/recaptcha_http.ex

defmodule LandingPage.Clients.GoogleRecaptchaHttp do
  use HTTPoison.Base

  @secret_key Application.get_env(:landing_page, :google_recaptcha)[:secret_key]

  def verify(token) do
    params = %{
      secret: @secret_key,
      response: token
    }

    "/siteverify"
    |> get!([], params: params)
    |> case do
         %{status_code: 200, body: body} ->
           {:ok, body}

         response ->
           {:error, response}
       end
  end

  def process_url(url) do
    "https://www.google.com/recaptcha/api" <> url
  end

  def process_response_body(body), do: Poison.decode!(body, keys: :atoms)
end
Using HTTPoison.Base gives us mostly all the functionality that we need
out of the box. The verify/1 function receives a token and sends an HTTP
request against the specified URL, with the secret_key and the user’s
token. Depending on the result, it returns a tuple with the :ok atom and
the processed body using the process_response_body/1 function, or one
containing :error and the response. To finish the client, we need to set
the value of @secret_key in the application’s config:
# config/config.exs

# ...

config :landing_page,
  google_recaptcha: [
    secret_key: "SET_HERE_YOUR_SECRET_KEY"
  ]
Jumping back to the reCAPTCHA docs, we can see that the response body looks like the following:
{
  "success": true|false,
  "challenge_ts": timestamp,  // timestamp of the challenge load (ISO format yyyy-MM-dd'T'HH:mm:ssZZ)
  "hostname": string,         // the hostname of the site where the reCAPTCHA was solved
  "error-codes": [...]        // optional
}
Having this in mind, we can go ahead and create a new function in the
Marketing module to subscribe and create new leads:
# lib/landing_page/marketing/marketing.ex

alias LandingPage.Clients.GoogleRecaptchaHttp
# ...

defmodule LandingPage.Marketing do
  # ...

  def subscribe(lead_params) do
    token = Map.get(lead_params, "recaptcha_token")

    with %Ecto.Changeset{valid?: true} = changeset <- Lead.changeset(%Lead{}, lead_params),
         {:ok, %{success: true}} <- GoogleRecaptchaHttp.verify(token),
         {:ok, lead} <- Repo.insert(changeset) do
      {:ok, lead}
    else
      {:ok, %{success: false}} ->
        {:error, :invalid_recaptcha_token}

      {:error, response} ->
        {:error, response}

      other ->
        {:error, other}
    end
  end
end
So, if everything goes as expected, subscribe/1 receives the
lead_params and validates them against a lead changeset, verifying the
token using the client, inserting the lead and returning a tuple
containing it. On the other hand, if the token validation returns {:ok, %{success: false}}, which means that is not valid, it returns a {:error, :invalid_recaptcha_token} tuple.
Let’ write some tests to check that everything is currently behaving as it should:
# test/landing_page/marketing/marketing_test.exs

defmodule LandingPage.MarketingTest do
  use LandingPage.DataCase

  # ...

  describe "leads" do
    # ...

    test "subscribe/1 with valid data and token creates a lead" do
      assert {:ok, %Lead{}} = Marketing.subscribe(@valid_attrs)
    end

    test "subscribe/1 with invalid token returns error changeset" do
      params = %{@valid_attrs | "recaptcha_token" => "invalid"}
      assert {:error, :invalid_recaptcha_token} = Marketing.subscribe(params)
    end
  end
end
Before running the test, let’s think about our current solution for
a second. Every time that we run the tests, the GoogleRecaptchaHttp client
is going to be sending requests, slowing down the test suite, and we do
not really want that. Moreover, knowing beforehand what the Google’s API
returns, we no longer need to send a real request to test what we need.
There are many ways of implementing a workaround for this, but one of my
favorite ones is creating a mock client, which returns fake responses,
based on the API specification, and use either of the clients depending on
the environment. Let’s stick to this approach, and create a new mock
client:
# lib/landing_page/clients/google/recaptcha_mock.ex

defmodule LandingPage.Clients.GoogleRecaptchaMock do
  def verify("invalid"), do: {:ok, %{success: false}}
  def verify(_token), do: {:ok, %{success: true}}
end
To use a specific client depending on the current environment that the application is running in, we can just set the module we want to use in that environment configuration file:
# config/config.exs

# ...

config :landing_page,
  google_recaptcha: [
    secret_key: "SET_HERE_YOUR_SECRET_KEY",
    client: LandingPage.Clients.GoogleRecaptchaHttp
  ]
# config/test.exs
# ...
config :landing_page,
google_recaptcha: [
client: LandingPage.Clients.GoogleRecaptchaMock
]
Finally, let’s refactor the Marketing module to use the client set in the
environment:
# lib/landing_page/marketing/marketing.ex

alias LandingPage.Clients.GoogleRecaptchaHttp
# ...

@google_recaptcha_client Application.get_env(:landing_page, :google_recaptcha)[:client]

defmodule LandingPage.Marketing do
  # ...

  def subscribe(lead_params) do
    token = Map.get(lead_params, "recaptcha_token")

    with %Ecto.Changeset{valid?: true} = changeset <- Lead.changeset(%Lead{}, lead_params),
         {:ok, %{success: true}} <- @google_recaptcha_client.verify(token),
         {:ok, lead} <- Repo.insert(changeset) do
      {:ok, lead}
    else
      # ...
end
@google_recaptcha_client contains the client module, which in the test
environment is the mock client, so we can non safely run the tests:
➜ mix test test/landing_page/marketing/marketing_test.exs
....

Finished in 0.1 seconds
4 tests, 0 failures

Randomized with seed 506123
And they all pass, yay!
We are still missing an important part though. We need to update the
LeadController module to use the new subscribe function we just
created:
# lib/landing_page_web/controllers/v1/lead_controller.ex

defmodule LandingPageWeb.V1.LeadController do
  use LandingPageWeb, :controller

  alias LandingPage.Marketing

  plug(:scrub_params, "lead")

  def create(conn, %{"lead" => params}) do
    with {:ok, lead} <- Marketing.subscribe(params) do
      json(conn, lead)
    end
  end
end
We also need to handle in the FallbackController module the {:error, :invalid_recaptcha_token} response resulting from an invalid token check:
# lib/landing_page_web/controllers/fallback_controller.ex

defmodule LandingPageWeb.FallbackController do
  use LandingPageWeb, :controller

  # ...

  def call(conn, {:error, :invalid_recaptcha_token}) do
    conn
    |> put_status(:unprocessable_entity)
    |> render(LandingPageWeb.ErrorView, "invalid_recaptcha_token.json")
  end
end
Finally, let’s edit the ErrorView module in order to add the
necessary render function:
# lib/landing_page_web/views/error_view.ex

defmodule LandingPageWeb.ErrorView do
  # ...

  def render("invalid_recaptcha_token.json", _) do
    %{recaptcha_token: ["the response is invalid"]}
  end

  # ...
end
Following the same convention for validation errors, we return a map with the error we want to render below the reCAPTCHA widget. Let’s add a test to check that it works:
# test/landing_page_web/controllers/v1/lead_controller_test.exs

defmodule LandingPageWeb.V1.LeadControllerTest do
  use LandingPageWeb.ConnCase

  describe "POST /api/v1/leads" do
    # ...

    test "returns error response with invalid token", %{conn: conn} do
      params = %{
        "lead" => %{
          "full_name" => "John",
          "email" => "foo@bar.com",
          "recaptcha_token" => "invalid"
        }
      }

      conn = post(conn, lead_path(conn, :create), params)

      assert json_response(conn, 422) == %{
               "recaptcha_token" => ["the response is invalid"]
             }
    end
  end
end
➜ mix test test/landing_page_web/controllers/v1/lead_controller_test.exs
...
Finished in 0.1 seconds
3 tests, 0 failures
Randomized with seed 723440
To test it in the browser, we can edit the Elm Commands module and
simply set a hardcoded value for the recaptcha_token parameter:
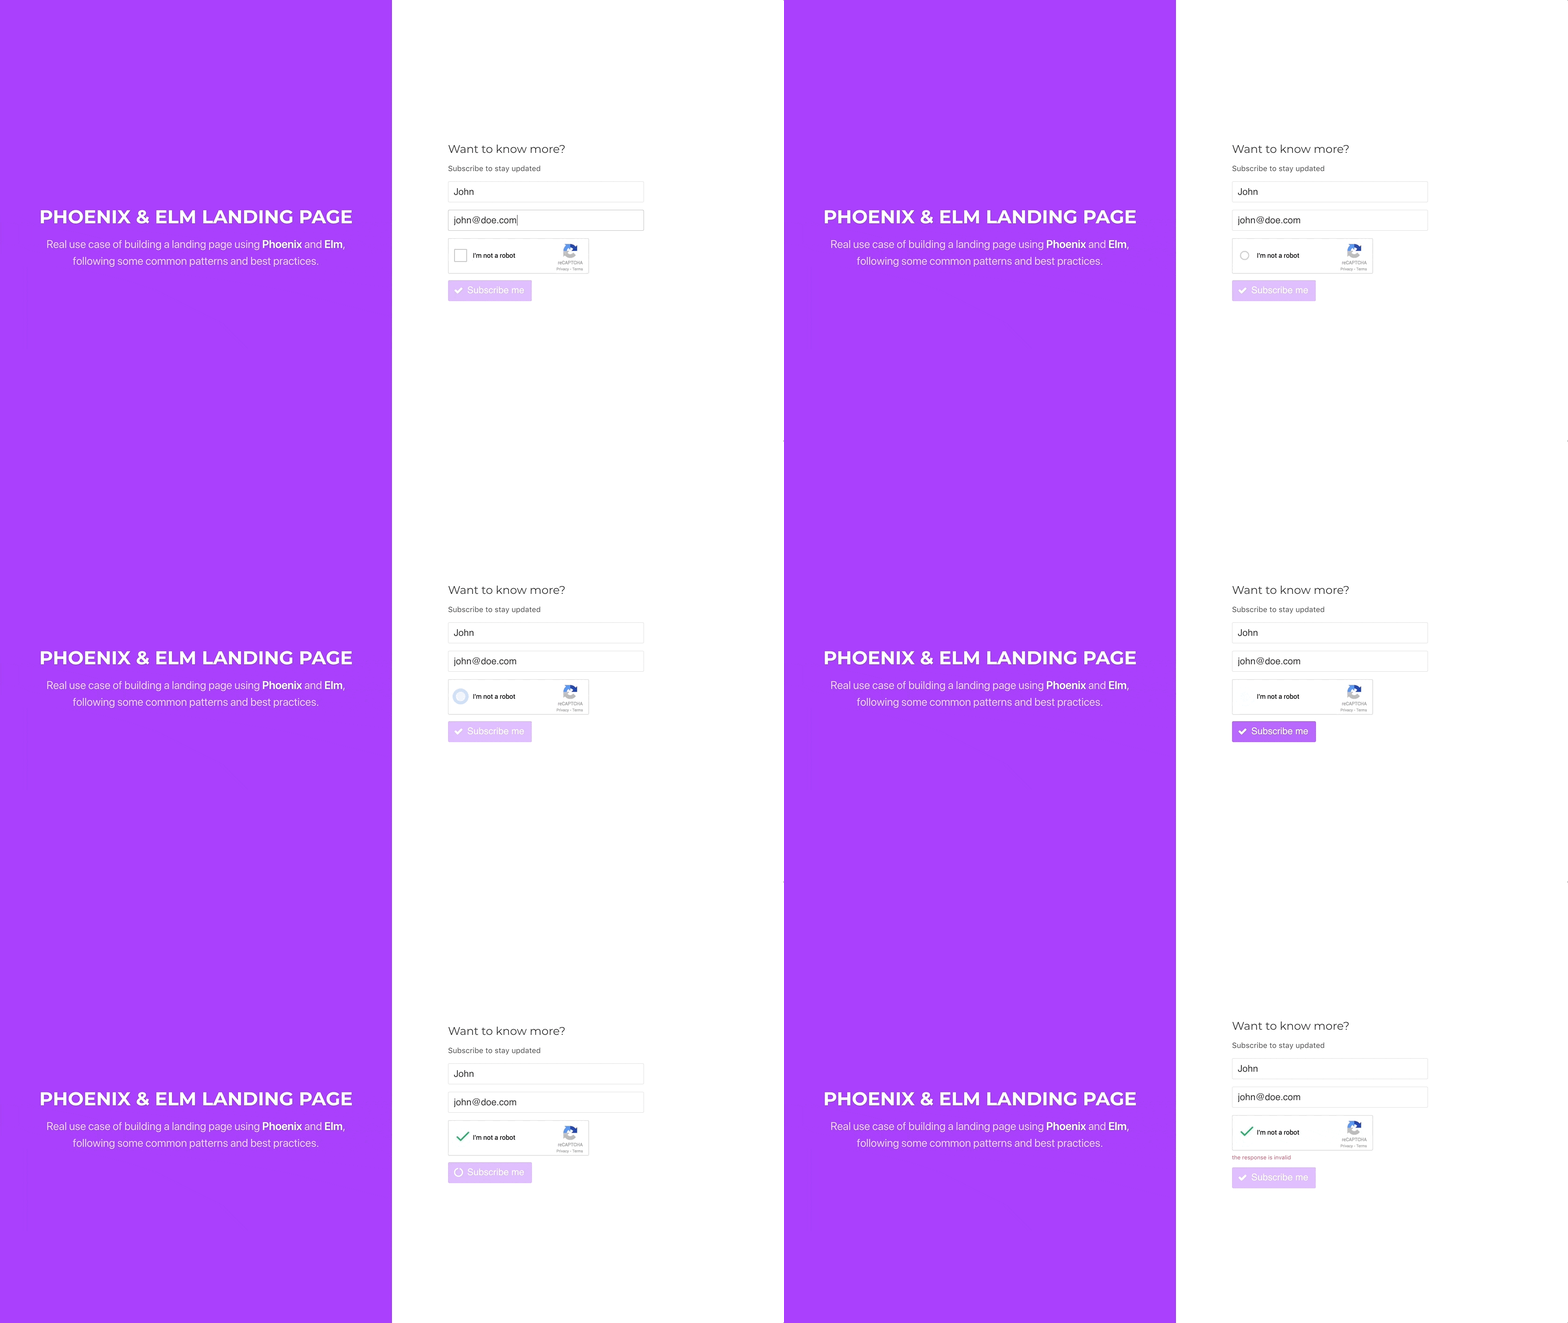
However, wait a minute. If the token is invalid, there is no current way of resetting the widget again, so the user is not able to resubmit the form. Let’s fix this.
Resetting the token on error
Luckily for us, the widget has a reset function and we
can call it through an Elm port. Let’s edit the Ports module and add
a new outgoing port:
-- assets/elm/src/Ports.elm

port module Ports exposing (..)

-- OUT PORTS


-- ...


port resetRecaptcha : () -> Cmd msg


-- ...
Next, we have to subscribe to the new port and call the widget’s reset
function:
// assets/javascript/app.js

import Elm from './elm/main';

window.onloadCallback = () => {
  const formContainer = document.querySelector('#form_container');

  if (formContainer) {
    const app = Elm.Main.embed(formContainer);
    let recaptcha;

    // ...

    app.ports.resetRecaptcha.subscribe(() => {
      grecaptcha.reset(recaptcha);
    });
  }
};
And finally, we have to trigger the resetRecaptcha wherever we need, so
let’s do it on any response error that we receive from the server:
-- assets/elm/src/Update.elm

module Update exposing (update)

update : Msg -> Model -> ( Model, Cmd Msg )
update msg model =
    -- ...

      SubscribeResponse (Err (BadStatus response)) ->
          case Decode.decodeString validationErrorsDecoder response.body of
              Ok validationErrors ->
                  { model | subscribeForm = Invalid { formFields | recaptchaToken = Nothing } validationErrors } ! [ Ports.resetRecaptcha () ]

              Err error ->
                  { model | subscribeForm = Errored { formFields | recaptchaToken = Nothing } "Oops! Something went wrong!" } ! [ Ports.resetRecaptcha () ]

      SubscribeResponse (Err error) ->
          { model | subscribeForm = Errored { formFields | recaptchaToken = Nothing } "Oops! Something went wrong!" } ! [ Ports.resetRecaptcha () ]
Let’s jump back to the browser and check that it actually is working fine:
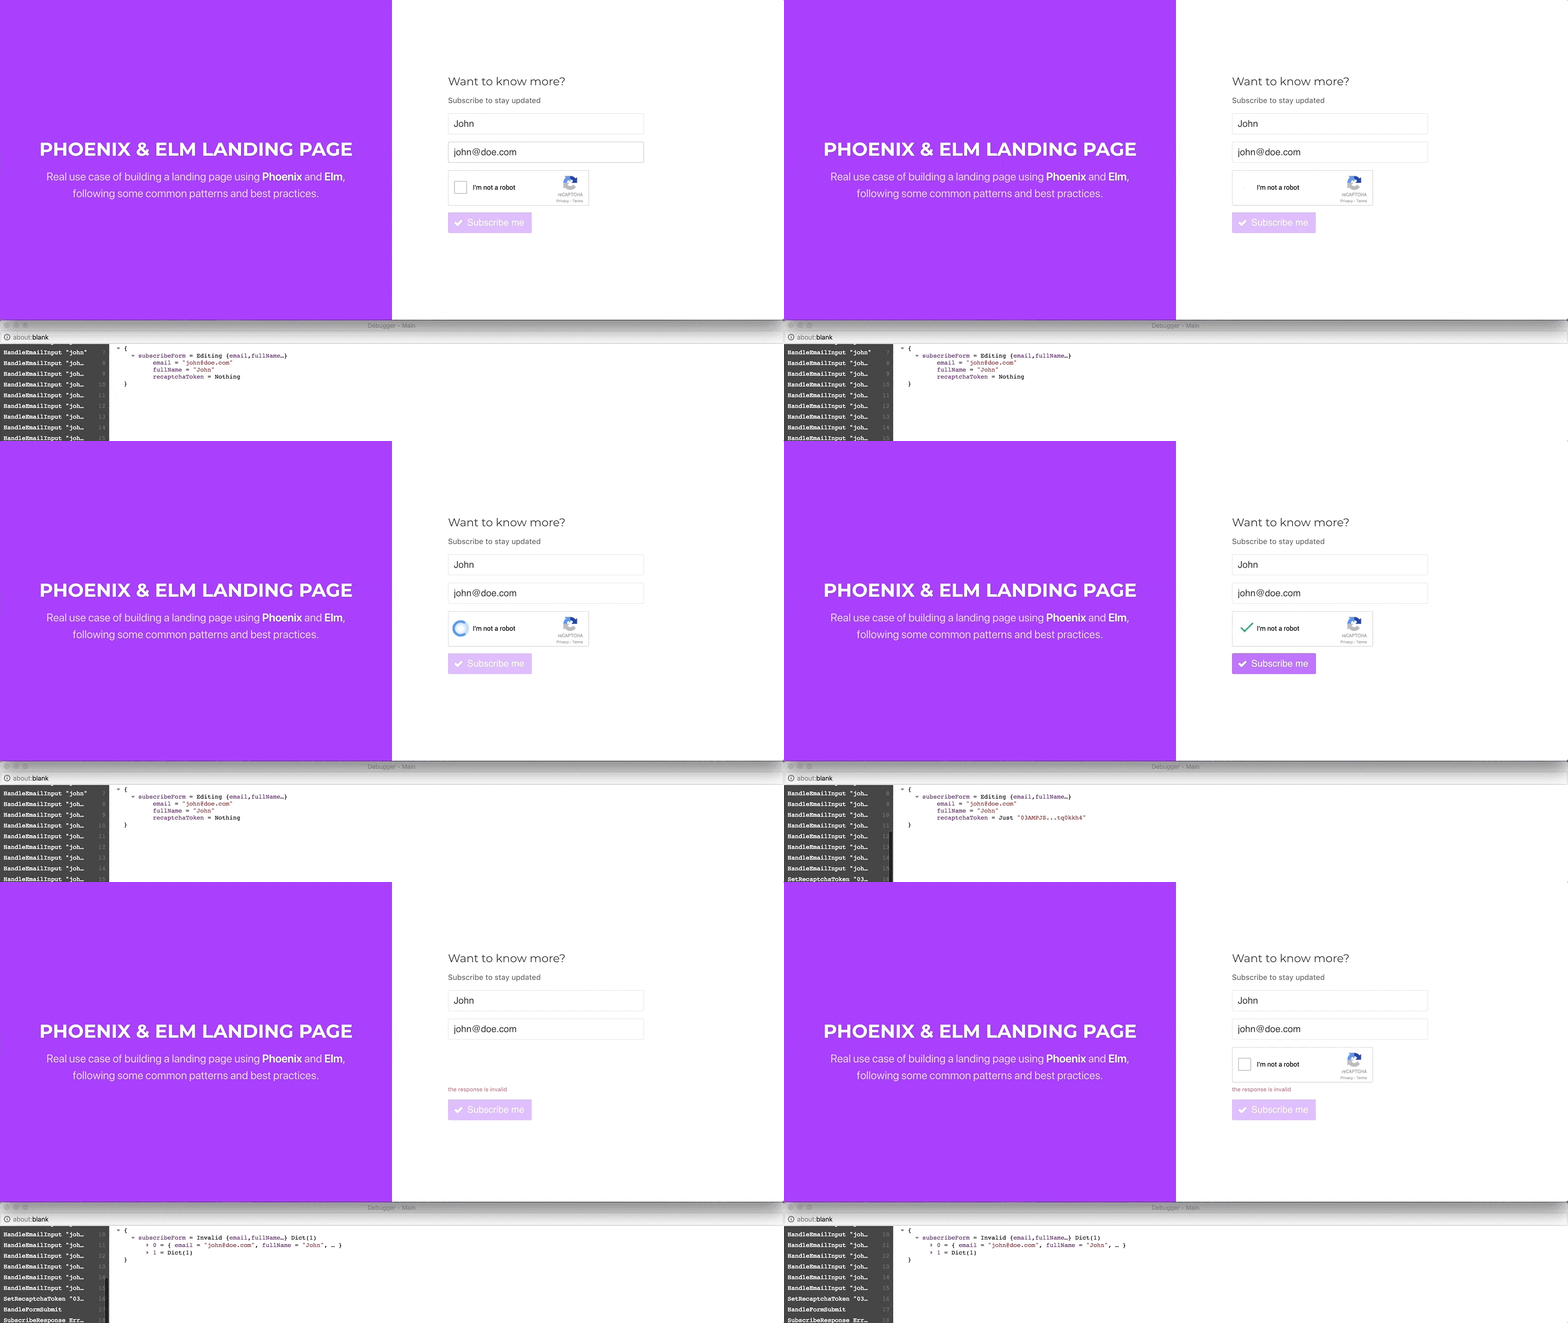
The widget is reset as expected, allowing the user to click it again.
Let’s remove the hardcoded value from the recaptcha_token on the post
parameters and test that everything works fine and the lead subscribes
successfully:

And there we go. Our very basic landing page is ready for deployment and subscribing new leads, without making us worry about spambots. I hope you have enjoyed these series as much as I have enjoyed doing them. See you next time, and don’t forget to check the code from this part here.
Happy coding!
