This post belongs to the Building a simple Calendly clone with Phoenix LiveView series.
- Introduction.
- Generating the initial project and domain models.
- The event type selection page.
- Rendering the monthly calendar.
- Booking time slots for an event type.
- Managing event types, part one.
- Managing event types, part two.
- Managing event types, part three.
- Coming soon...
Live demo
In the last part of the series, we implemented the necessary logic for adding and editing event types. In this part, we will finish the even types’ management screen, adding the ability to the user to clone and delete any existing event type. Let’s get cracking!
The event type dropdown menu
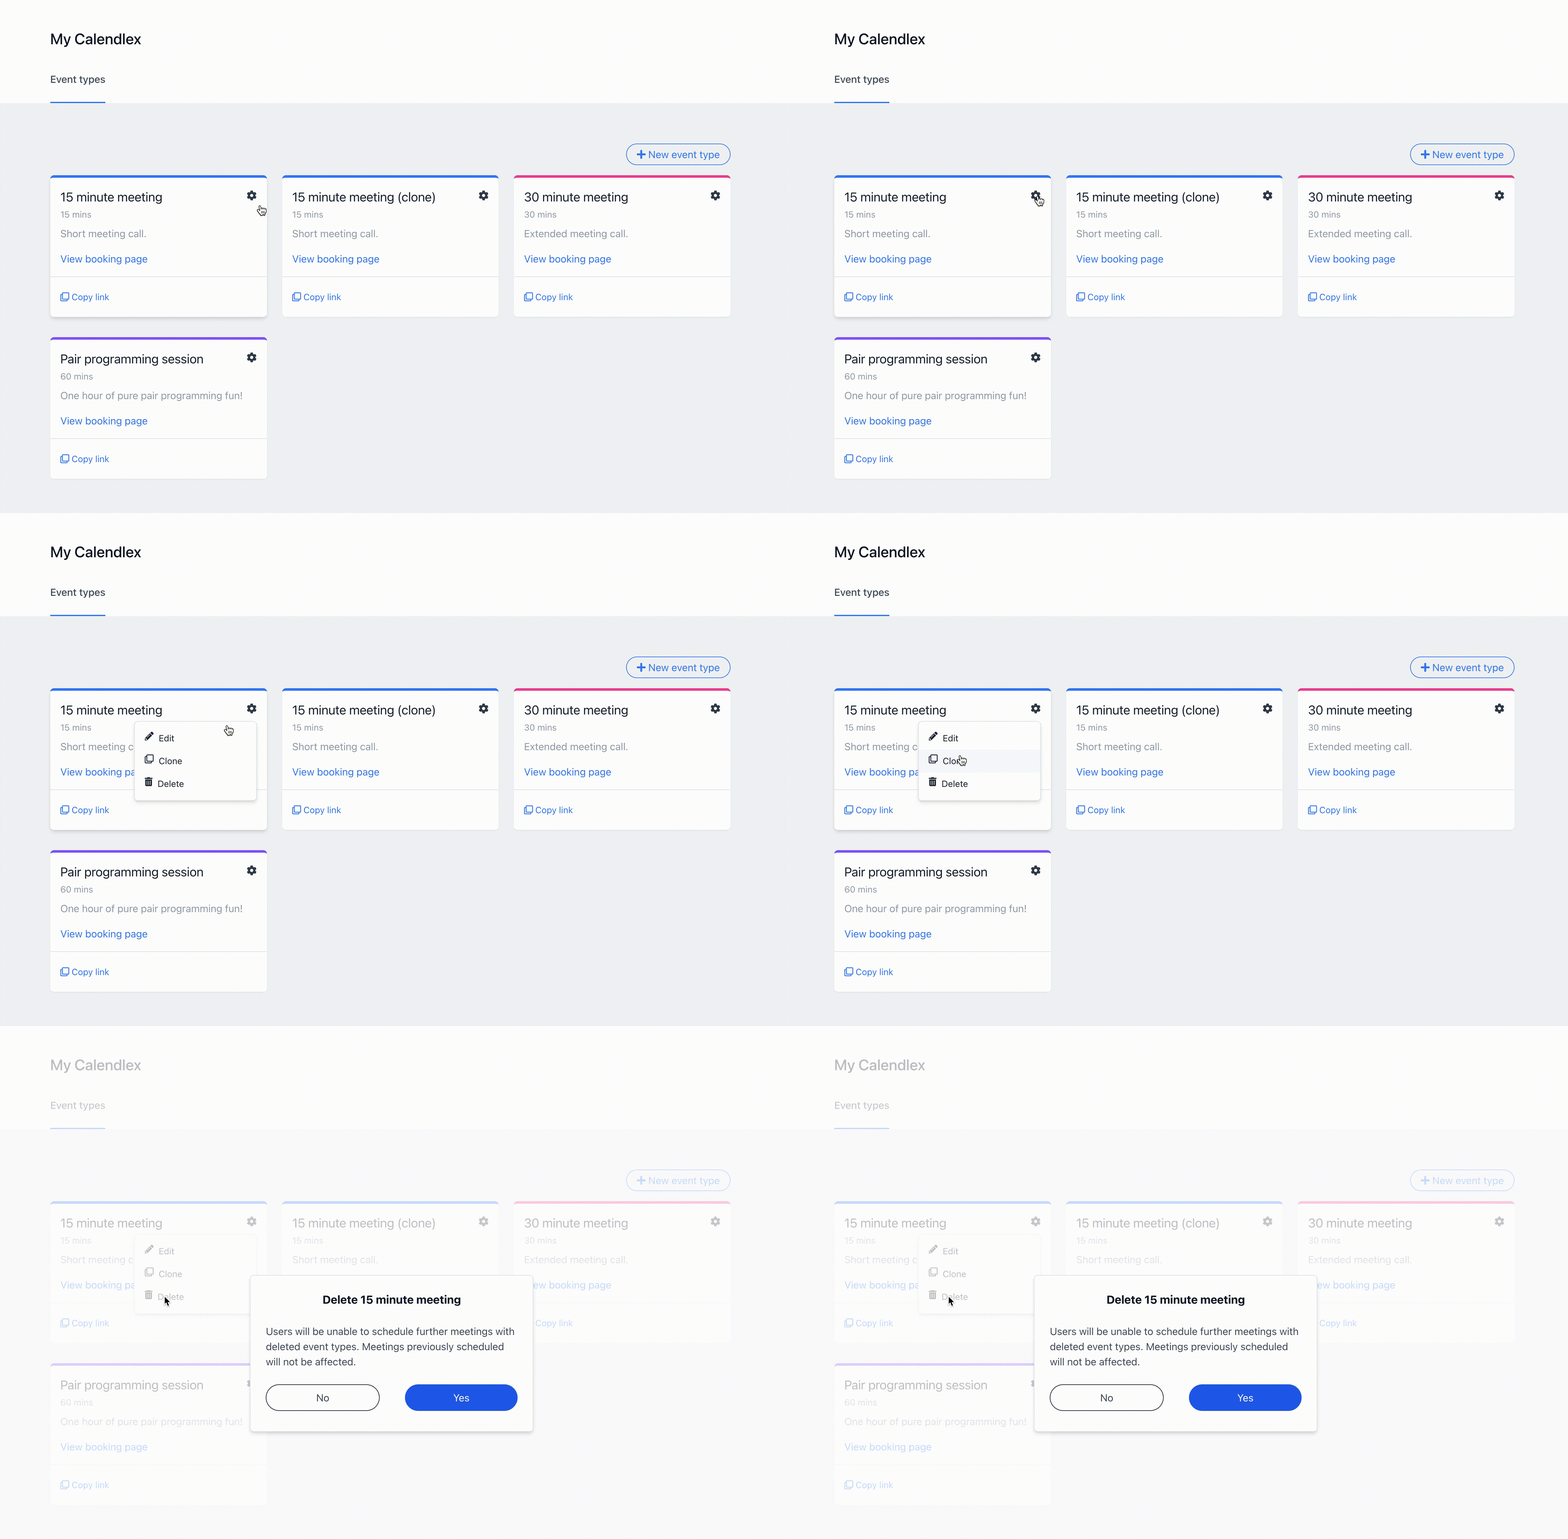
To display the clone and delete options to the user, we will implement a dropdown menu that we will add to every even type card in the list. The final result will be something similar to the following:

Since this will not be the only dropdown that we will be using in the application, we will create a new function/stateless component to implement it, and it will consist of two parts:
- An HTML element that will trigger the event to toggle the dropdown’s content when the user clicks on it.
- An HTML content shown/hidden to the user when the trigger gets clicked.
The function components that we have been using until now only receive data, and they always render the same HTML. How can this new component accept any HTML from outside, respecting its inner layout? Fortunately, function components have a mechanism called slots to pass them HTML blocks as in regular HTML tags. To see how it works, let’s add the new component’s module:
# ./lib/calendlex_web/live/admin/components/dropdown.ex

defmodule CalendlexWeb.Admin.Components.Dropdown do
  use Phoenix.Component

  alias Phoenix.LiveView.JS

  def main(assigns) do
    ~H"""
    <div
      id={@id}
      class="relative dropdown"
      phx-click-away={click_away(@id)}>
      <div
        class="flex items-baseline cursor-pointer gap-x-1 dropdown-trigger"
        phx-click={trigger_click(@id)}>
        <%= render_slot(@trigger) %>
      </div>
      <div class="absolute right-0 z-20 flex flex-col hidden py-2 mt-2 overflow-hidden text-sm text-gray-800 bg-white border shadow-md rounded-md dropdown-content">
        <%= render_slot(@inner_block) %>
      </div>
    </div>
    """
  end

  defp click_away(id), do: JS.hide(to: content_selector(id), transition: "hidden", time: 0)

  defp trigger_click(id),
    do: JS.toggle(to: content_selector(id), in: "block", out: "hidden", time: 0)

  defp content_selector(id), do: "##{id} .dropdown-content"
end
The module exposes a main/1 function which renders a regular dropdown, consisting of a parent div containing two divs:
-
The first one renders the trigger slot element using
render_slot(@trigger). -
The second one renders the nested content slot using
render_slot(@inner_block).
The main difference between both slots is that @trigger is a named slot, and we can call it how we want, whereas @inner_block is a protected name representing the nested DOM elements that we will include between the Dropdown.main enclosing tags. To toggle the visibility of the dropdown, we are using the Phoenix.LiveView.JS module, which provides a series of functions to execute JavaScript utility operations on the client:
-
We have added a
phx-click={trigger_click(@id)}to the trigger, which callsJS.toggle/1, passing the corresponding DOM selector, and the necessary classes to show/hide the dropdown’s content. -
The main div has a
phx-click-away={click_away(@id)}event handler to hide the dropdown when the user clicks outside of it. The function usesJS.hide/1, passing the corresponding content selector and transition classes.
With the Dropdown.main component ready, let’s add it to the event type card:
# ./lib/calendlex_web/live/admin/components/event_type.ex

defmodule CalendlexWeb.Admin.Components.EventType do
  use CalendlexWeb, :live_component

++alias CalendlexWeb.Admin.Components.Dropdown

  # ...
end
# ./lib/calendlex_web/live/admin/components/event_type.html.heex
<div class={"relative flex flex-col p-4 mb-2 border-gray-900 text-gray-400 bg-white cursor-pointer rounded-md shadow-sm hover:shadow-md border-t-4 #{@event_type.color}-border"}>
++<div class="absolute top-4 right-4">
++ <Dropdown.main id={"dropdown_#{@event_type.id}"}>
++ <:trigger>
++ <span class="text-gray-700"><i class="fas fa-cog"></i></span>
++ </:trigger>
++ <div class="w-48">
++ <%= live_redirect to: Routes.live_path(@socket, CalendlexWeb.Admin.EditEventTypeLive, @event_type.id), class: "px-4 py-2 text-left hover:bg-gray-50 flex gap-x-2" do %>
++ <i class="fas fa-pencil-alt"></i> Edit
++ <% end %>
++ <a class="flex px-4 py-2 text-left hover:bg-gray-50 gap-x-2"
++ phx-target={@myself}
++ phx-click="clone_me">
++ <i class="far fa-clone"></i> Clone
++ </a>
++ <a class="flex px-4 py-2 text-left hover:bg-gray-50 gap-x-2"
++ phx-target={@myself}
++ phx-click="delete_me">
++ <i class="fas fa-trash-alt"></i> Delete
++ </a>
++ </div>
++ </Dropdown.main>
++</div>
# ...
</div>
We invoke it using an HTML tag like any other function component, setting the id attribute it needs to toggle its content. The difference with the rest of the functions components we have implemented so far is that this one has nested content consisting of:
-
A
<:trigger>...</:trigger>holding the content of thetriggernamed slot. -
A set of HTML nodes corresponding to the
inner_blockslot, or in other words, the content that we want to toggle when the user clicks on the trigger.
If we jump back to the browser and head to http://localhost:4000/admin, we should be able of toggling the dropdown menus of the event types:

How cool is that? Regarding the dropdown options, we have an edit link pointing to the EditEventTypeLive live path we implemented in the last part and two different events for cloning and deleting the given event type, targeting the CalendlexWeb.Admin.Components.EventType live component.
Cloning an event type
Let’s take care first of cloning an event type:
# ./lib/calendlex_web/live/admin/components/event_type.ex

defmodule CalendlexWeb.Admin.Components.EventType do
  use CalendlexWeb, :live_component

  alias CalendlexWeb.Admin.Components.Dropdown

  # ...

  def handle_event("clone_me", _params, socket) do
    event_type = socket.assigns.event_type

    case Calendlex.clone_event_type(event_type) do
      {:ok, new_event_type} ->
        {:noreply,
         push_redirect(socket,
           to: Routes.live_path(socket, CalendlexWeb.Admin.EditEventTypeLive, new_event_type.id)
         )}

      {:error, _} ->
        send(self(), :clone_error)
        {:noreply, socket}
    end
  end
end
The event handler takes the event_type from the socket assigns and calls Calendlex.clone_event_type/1, which we will implement in a minute. If everything goes fine, it redirects to the CalendlexWeb.Admin.EditEventTypeLive live path. On the contrary, it sends a :clone_error message to the parent live view to render the corresponding error. Let’s implement the clone logic:
# ./lib/calendlex.ex

defmodule Calendlex do
  # ...

  defdelegate clone_event_type(event_type), to: Calendlex.EventType.Repo, as: :clone
end
# ./lib/calendlex/event_type/repo.ex
defmodule Calendlex.EventType.Repo do
import Ecto.Query, only: [where: 3, order_by: 3]
# ...
def clone(%EventType{name: name, slug: slug} = event_type) do
event_type
|> Map.from_struct()
|> Map.put(:name, "#{name} (clone)")
|> insert()
end
end
For the sake of simplicity, the clone/1 function takes an %EventType{}, creates a map of it, adds the (clone) string to its name, and inserts it into the database. Let’s fulfill the error message in the parent live view:
# ./calendlex_web/live/admin/event_types_live.ex

defmodule CalendlexWeb.Admin.EventTypesLive do
  use CalendlexWeb, :admin_live_view

  # ...

  def handle_info(:clone_error, socket) do
    {:noreply, put_flash(socket, :error, "A similar event type already exists")}
  end
end
The message handler in the parent CalendlexWeb.Admin.EventTypesLive live view puts a flash error in the socket. Let’s jump back to the browser and test everything by cloning any event type. If we clone the “15 minute meeting” event type, we should see the following in the list:

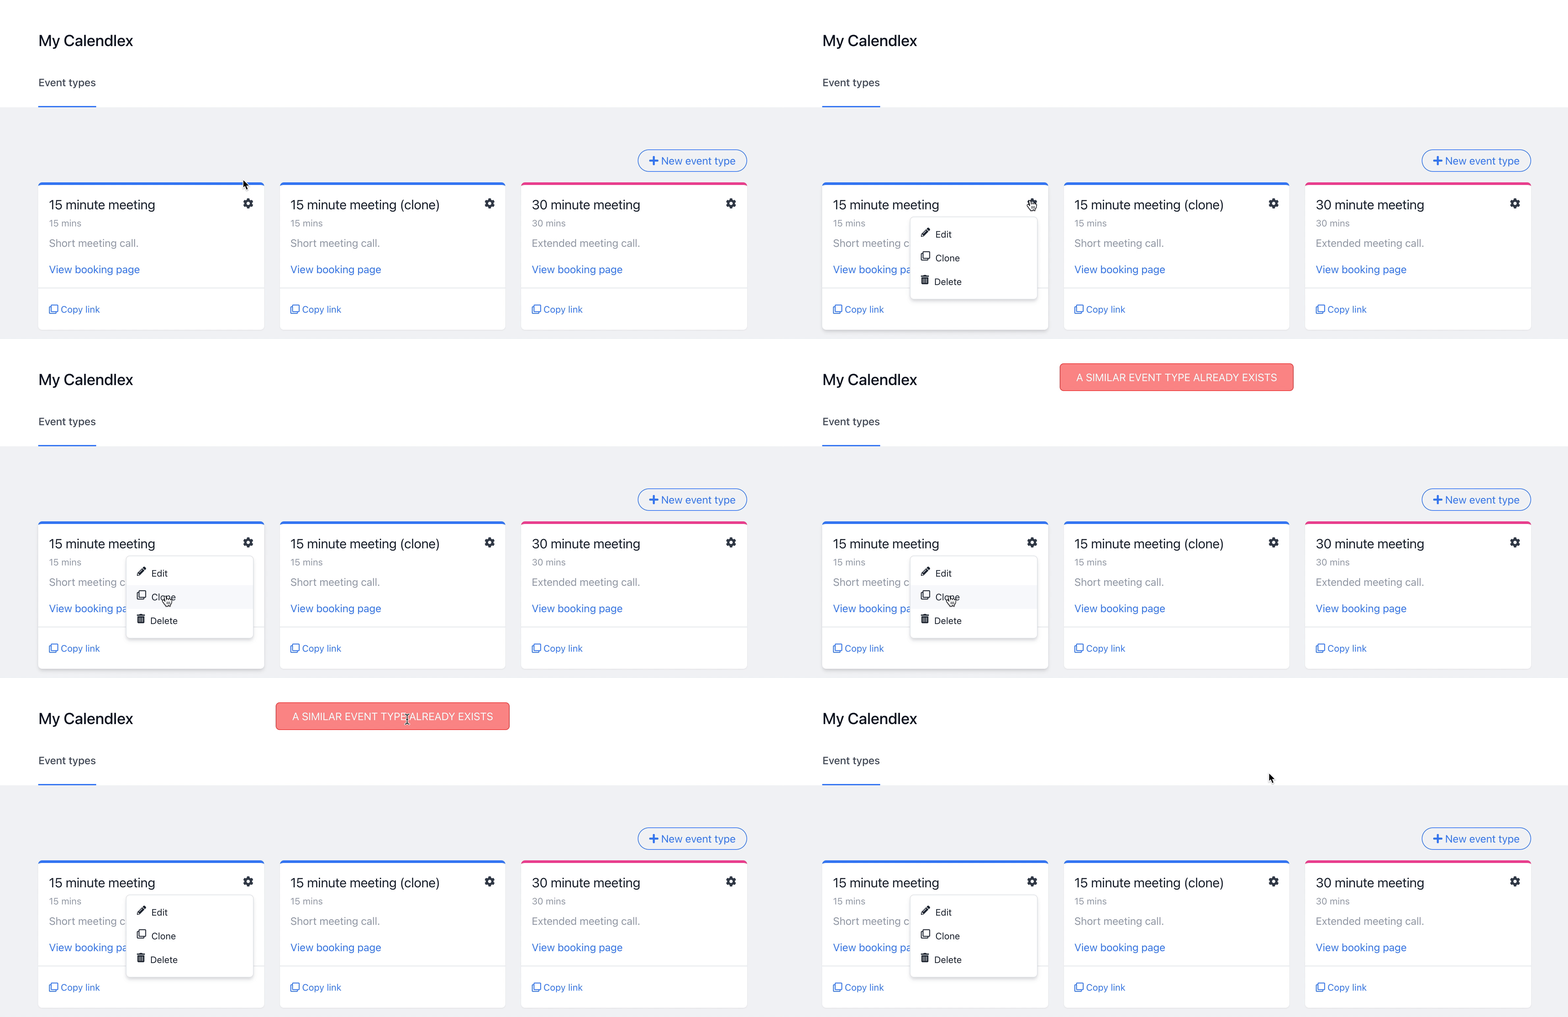
There is a new “15 minute meeting (clone)” event type. However, if we try to clone “15 minute meeting” again, we shouldn’t see anything happening apart from the following error in the console due to the event type’s slug unique constraint:
iex(4)> [debug] QUERY ERROR db=1.9ms queue=0.6ms idle=1604.2ms
INSERT INTO "event_types" ("color","description","duration","name","slug","inserted_at","updated_at","id") VALUES ($1,$2,$3,$4,$5,$6,$7,$8) ["blue", "Short meeting call.", 15, "15 minute meeting (clone)", "15-minute-meeting-clone", ~N[2022-02-03 06:11:52], ~N[2022-02-03 06:11:52], <<108, 252, 29, 54, 186, 121, 69, 165, 169, 33, 78, 202, 160, 116, 152, 100>>]
This is far from being the best user experience, so let’s take care of displaying the flash messages properly.
Displaying flash messages to the user
Let’s edit the admin.html.heex layout template and add the missing flash messages:
# ./lib/calendlex_web/templates/layout/admin.html.heex

<main role="main" class="flex flex-col flex-1">
  <div class="bg-white">
    # ...
  </div>
  <section class="container flex-1 w-3/5 py-12 mx-auto">
    <div id="flash" phx-hook="Flash">
      <%= if Map.has_key?(@flash, "info") do  %>
        <div
            class="fixed px-6 py-2 text-white uppercase bg-green-400 border border-green-500 flash alert alert-info top-10 left-1/2 rounded-md bg-opacity-80 -translate-x-1/2"
            role="alert"
            phx-click="lv:clear-flash"
            phx-value-key="info"
            >
            <%= live_flash(@flash, :info) %>
        </div>
      <% end %>

      <%= if Map.has_key?(@flash, "error") do  %>
        <div
            class="fixed px-6 py-2 text-white uppercase bg-red-400 border border-red-500 flash alert alert-error top-10 left-1/2 rounded-md bg-opacity-80 -translate-x-1/2"
            role="alert"
            phx-click="lv:clear-flash"
            phx-value-key="error"
            >
            <%= live_flash(@flash, :error) %>
        </div>
      <% end %>
    </div>

    <%= @inner_content %>
  </section>
</main>
We have added a new div with the “flash” id and to which we have attached a new hook called Flash. Inside this div, we only render the info and error flash messages if the corresponding keys exist in the @flash assigns. Both of these divs have a live event handler, phx-click="lv:clear-flash", which is a specific LiveView feature to clear flash messages when sent to the server. To finish implementing the flash messages, let’s add the Flash hook to our hooks file:
// ./assets/js/hooks.js

const Hooks = {};

// ...

Hooks.Flash = {
  mounted() {
    this.initFlash();
  },
  updated() {
    this.initFlash();
  },

  initFlash() {
    const flash = this.el.querySelector('.flash');

    if (flash) {
      setTimeout(() => {
        this.pushEvent('lv:clear-flash');
      }, 2000);
    }
  },
};

// ...
The hook is straightforward. It checks if there is a flash message inside its el, sending the corresponding lv:clear-flash to the server after two seconds. Let’s jump back to the browser and try to clone the “15 minute meeting” event type again and see what happens:

The error message pops up and disappears after two seconds, as expected. Moreover, we should see the corresponding info messages since we have already been adding flash messages in the previous parts. Let’s go to any event type’s edit page and click on the “Save” button to check that everything is working fine:

Deleting event types
The last thing that we have to implement to finish managing event types is giving the ability to the user to delete a given one. Since scheduled events require an event type, we don’t want to lose track of them if we delete any. Therefore, we will implement a simple soft delete mechanism by adding an additional column to the event_types table:
❯ mix ecto.gen.migration add_deleted_at_to_event_types
* creating priv/repo/migrations/20220207062857_add_deleted_at_to_event_types.exs
# ./priv/repo/migrations/20220207062857_add_deleted_at_to_event_types.exs
defmodule Calendlex.Repo.Migrations.AddDeletedAtToEventTypes do
use Ecto.Migration
def change do
alter table(:event_types) do
add :deleted_at, :utc_datetime
end
end
endLet’s apply the change into the database:
❯ mix ecto.migrate

07:32:19.870 [info]  == Running 20220207062857 Calendlex.Repo.Migrations.AddDeletedAtToEventTypes.change/0 forward

07:32:19.874 [info]  alter table event_types

07:32:19.890 [info]  == Migrated 20220207062857 in 0.0s
Now we have to add the new field to the EventType schema:
# ./lib/calendlex/event_type.ex

defmodule Calendlex.EventType do
  use Ecto.Schema
  import Ecto.Changeset

  # ...

  schema "event_types" do
    # ...

    field :deleted_at, :utc_datetime

    # ...
  end

  @fields ~w(name description slug duration color deleted_at)a # We have added deleted_at to the list of fields

  # ...
With the new field ready, let’s take care of the delete event handling in the event type component:
# ./lib/calendlex_web/live/admin/components/event_type.ex

defmodule CalendlexWeb.Admin.Components.EventType do
  use CalendlexWeb, :live_component

  # ...

  def handle_event("delete_me", _params, socket) do
    event_type = socket.assigns.event_type

    send(self(), {:confirm_delete, event_type})

    {:noreply, socket}
  end
end
When the component receives a delete_me event, it sends a :confirm_delete message to the main live view containing the selected event type. Since deleting an item is an operation that cannot be undone, we want to make sure that we double-check that the user wants to delete it. Therefore, we will display a confirmation message, alerting the user about the operation and asking whether we should proceed with the deletion. To achieve this, let’s add use a new assign in the CalendlexWeb.Admin.EventTypesLive module:
# ./lib/calendlex_web/live/admin/event_types_live.ex

defmodule CalendlexWeb.Admin.EventTypesLive do
  use CalendlexWeb, :admin_live_view

  alias CalendlexWeb.Admin.Components.Modal

  # ...

  def handle_params(_, _, socket) do
    event_types = Calendlex.available_event_types()

    socket =
      socket
      |> assign(event_types: event_types)
      # ...
      |> assign(delete_event_type: nil)

    {:noreply, socket}
  end

  # ...

  def handle_info({:confirm_delete, event_type}, socket) do
    {:noreply, assign(socket, delete_event_type: event_type)}
  end
end
We have added a new :delete_event_type key to the socket’s assigns, initialized to null. The handle_info({:confirm_delete, event_type}, socket) event handler assigns the selected event type to the socket in the :delete_event_type key, telling the LiveView that we want to delete it. To display the confirmation message to the user, we will use a modal containing the message and buttons for confirming or dismissing the action. Since we will use another confirmation message in the next episode, we are going to create a new stateless component with the modal’s layout:
# ./lib/calendlex_web/live/admin/components/modal.ex
defmodule CalendlexWeb.Admin.Components.Modal do
use Phoenix.Component
def content(assigns) do
~H"""
<div class="fixed inset-0 z-20 overflow-y-auto"
phx-window-keydown="close_modal"
phx-key="escape">
<div class="flex items-end justify-center min-h-screen px-4 pt-4 pb-20 text-center sm:block sm:p-0">
<div class="fixed inset-0 bg-white bg-opacity-75 transition-opacity" aria-hidden="true"></div>
<span class="hidden sm:inline-block sm:align-middle sm:h-screen" aria-hidden="true">​</span>
<div class="inline-block overflow-hidden text-left align-bottom bg-white border border-gray-200 shadow-md rounded-md transform transition-all sm:my-8 sm:align-middle sm:max-w-md sm:w-full">
<div class="p-6 mx-auto mb-2 bg-white">
<header class="mb-6 text-center">
<h3 class="mb-3 text-lg font-bold text-gray-900">
<%= render_slot(@header) %>
</h3>
</header>
<%= render_slot(@inner_block) %>
<footer class="flex mt-6 gap-x-10">
<%= render_slot(@footer) %>
</footer>
</div>
</div>
</div>
</div>
"""
end
def cancel_button(assigns) do
~H"""
<button
class="flex-1 px-4 py-2 border border-gray-800 rounded-full"
phx-click="close_modal">
<%= render_slot(@inner_block) %>
</button>
"""
end
def confirm_button(assigns) do
~H"""
<button
class="flex-1 px-4 py-2 text-white bg-blue-600 rounded-full"
phx-click={@event}>
<%= render_slot(@inner_block) %>
</button>
"""
end
endThe modal consists of:
-
On top, there is a parent
divrepresenting the semitransparent overlay. It has aphx-window-keydownevent binding that sends amodal_closemessage to the LiveView when the user presses theescapekey. -
Inside the overlay, it has the modal body containing the
header,inner_block, andfooterslots. -
The module also exposes a
cancel_button/1and aconfirm_button/1buttons that render the modal buttons.
Let’s add the modal to the CalendlexWeb.Admin.EventTypesLive‘s template:
# ./lib/calendlex_web/live/admin/event_types_live.html.heex

# ...

<%= if @delete_event_type  do %>
  <Modal.content>
    <:header>Delete <%= @delete_event_type.name %></:header>
    <p>Users will be unable to schedule further meetings with deleted event types. Meetings previously scheduled will not be affected.</p>
    <:footer>
      <Modal.cancel_button>No</Modal.cancel_button>
      <Modal.confirm_button event="delete">Yes</Modal.confirm_button>
    </:footer>
  </Modal.content>
<% end %>
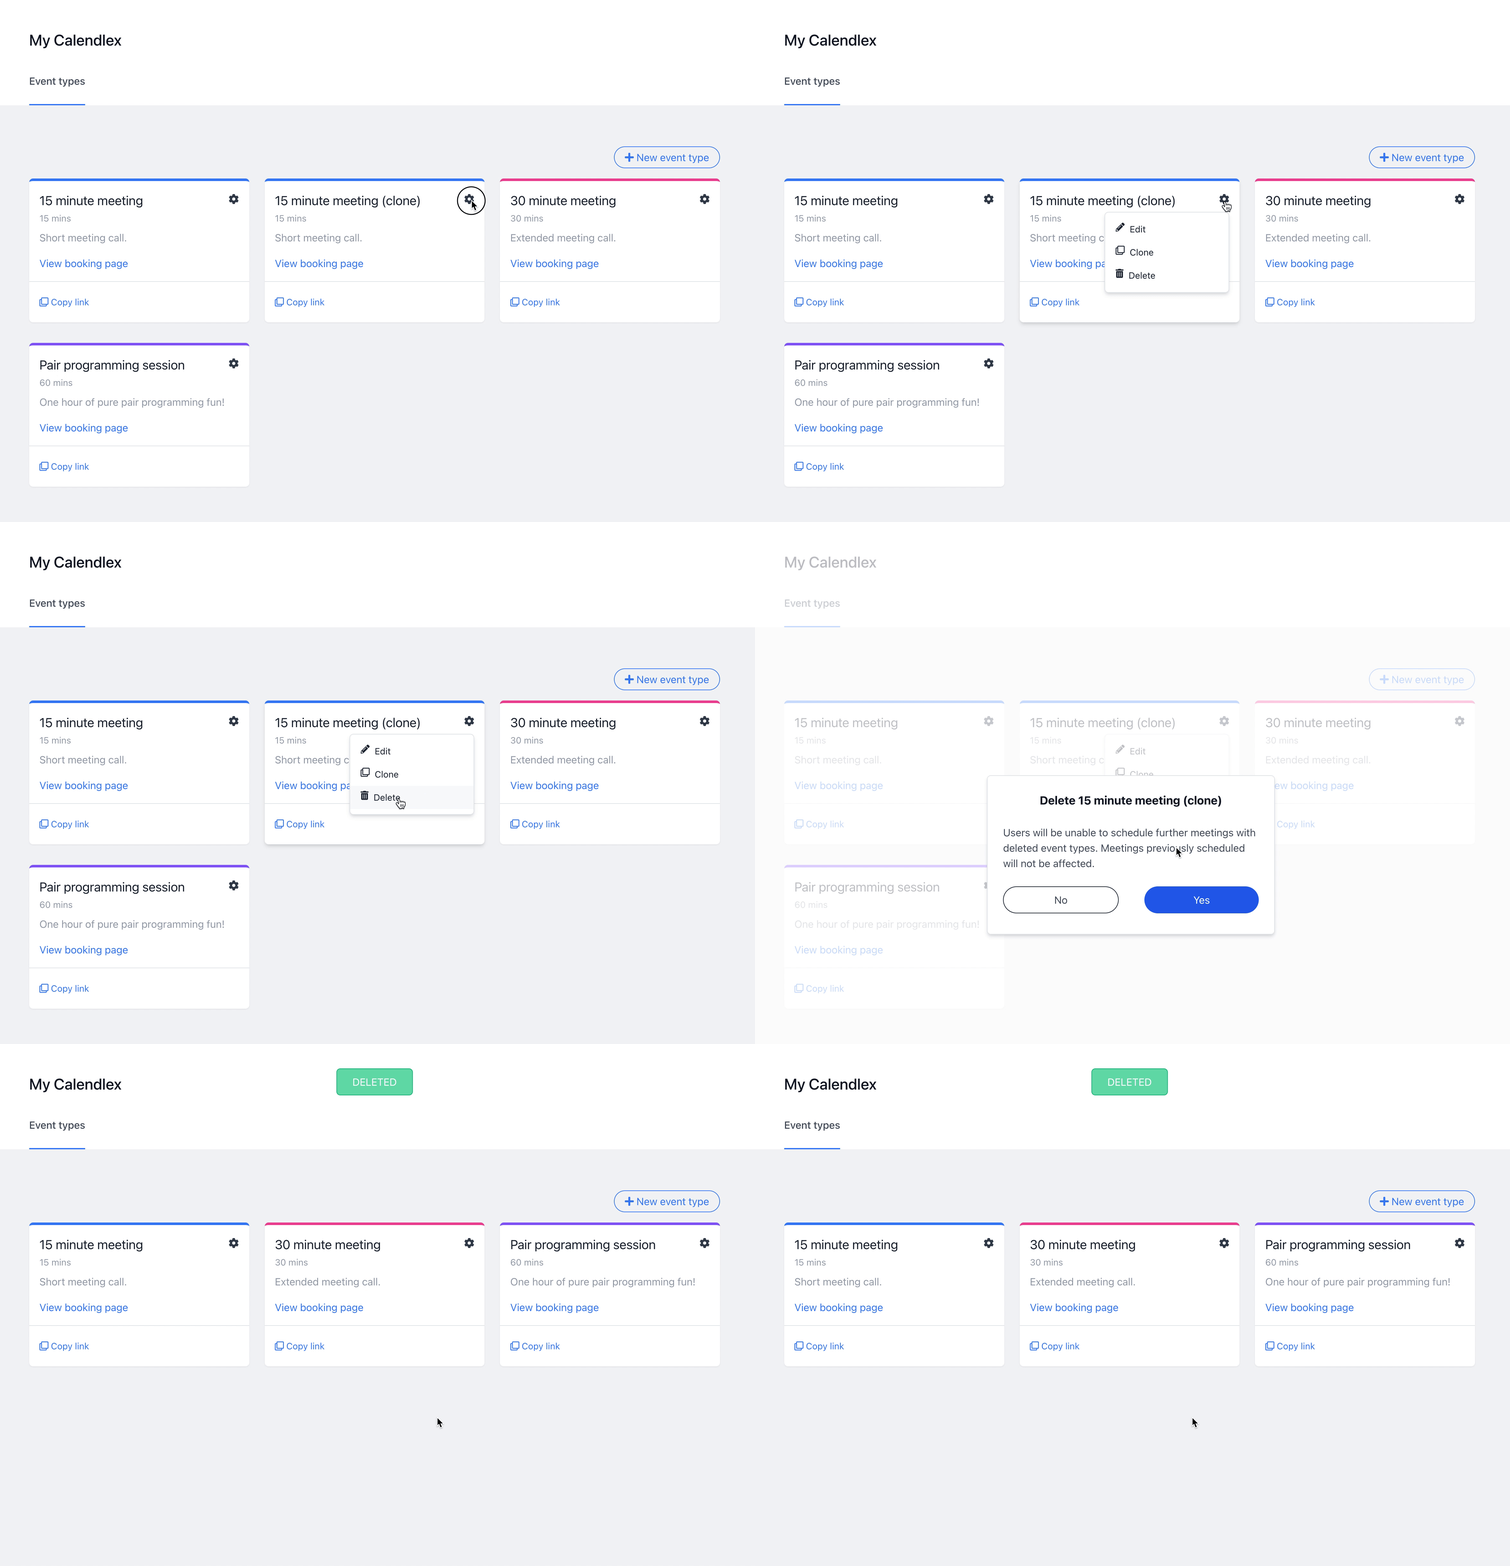
It conditional adds the modal component if delete_event_type is not null. Note how we implement the corresponding slots, especially :footer, containing the Modal.confirm_button with its event assign set to delete. If we jump to the browser and try to delete an event type, we should see the following:

Nice! The only thing left is to implement both the close_modal and delete events:
# ./lib/calendlex_web/live/admin/event_types_live.ex

defmodule CalendlexWeb.Admin.EventTypesLive do
  use CalendlexWeb, :admin_live_view

  # ...

  def handle_event("modal_close", _, socket) do
    {:noreply, assign(socket, delete_event_type: nil)}
  end

  def handle_event("delete", _, socket) do
    event_type = socket.assigns.delete_event_type

    {:ok, _} = Calendlex.delete_event_type(event_type)

    socket =
      socket
      |> put_flash(:info, "Deleted")
      |> push_patch(to: Routes.live_path(socket, __MODULE__))

    {:noreply, socket}
  end
end
The close_modal handler is straightforward: it simply sets the delete_event_type socket assign back to nil, which removes the modal from the DOM on the next render. The delete handler is a bit more complex: it takes the assigned delete_event_type and calls Calendlex.delete_event_type/1, which we will implement in a minute, and redirects to the same LiveView path, which will trigger its handle_params/3 callback function, resetting its internal state. Let’s add the missing functions:
# ./lib/calendlex.ex

defmodule Calendlex do
  # ...

  defdelegate delete_event_type(event_type), to: Calendlex.EventType.Repo, as: :delete
end
# ./lib/calendlex/event_type/repo.ex
defmodule Calendlex.EventType.Repo do
# ...
def delete(event_type) do
event_type
|> EventType.delete_changeset()
|> Repo.update()
end
end# ./lib/calendlex/event_type.ex
defmodule Calendlex.EventType do
use Ecto.Schema
import Ecto.Changeset
alias Ecto.Changeset
# ...
def delete_changeset(event_type) do
event_type
|> with_deleted_changes()
|> validate_required(@required_fields)
end
# ...
defp with_deleted_changes(%{name: name, slug: slug} = event_type) do
event_type
|> Changeset.change()
|> put_change(:name, "#{name} (deleted)")
|> put_change(:slug, "#{slug}-deleted-#{:os.system_time(:millisecond)}")
|> put_change(:deleted_at, DateTime.truncate(DateTime.utc_now(), :second))
end
end
The delete/1 function takes an event_type, creates the delete_changeset, and updates the event type. The delete_changeset function takes an event type, generating a new changeset with custom name, slug, and deleted_at attributes. There is still one slight change that we need to do, which is removing the deleted event types from the avalilable/0 function result, so they get removed from the UI:
# ./lib/calendlex/event_type/repo.ex

defmodule Calendlex.EventType.Repo do
  # ...

  def available do
    EventType
++  |> where([e], is_nil(e.deleted_at))
    |> order_by([e], e.name)
    |> Repo.all()
  end

  # ...
end
Let’s head back to the browser and see what happens when we delete an event type:

After confirming the action, we see the corresponding success flash message, and the deleted event type is no longer in the list. And this is it for this part, and we have finally finished with all the logic behind managing event types. In the next part, we will focus on the last part of this series, which is listing and filtering scheduled events. In the meantime, you don’t forget to check the final result in the live demo, or have a look at the source code.
Happy coding!
